19. OAuth
About this chapter
In this chapter we continue on our journey into authorization and look at implementing OAuth authentication using a 3rd party provider: Auth0. Completing this work will allow us to:
- Secure the
RegisterKeymethod in theRegistrationsController - Tie the API key registration to a real user logged in via Auth0
Learning outcomes
- Understand OAuth 2.0, OpenID Connect, and JWT tokens and how they relate to each other
- Configure Auth0 as a third-party identity provider for your application
- Implement JWT Bearer authentication in a .NET API
- Support multiple authentication schemes (OAuth and API Key) in the same application
- Build a JavaScript SPA that authenticates users via Auth0
- Make authenticated API calls using JWT tokens from the browser
- Handle OAuth redirect callbacks and manage authentication state in a client application
- Serve static files from an ASP.NET Core API to host a JavaScript client
- Troubleshoot common OAuth configuration issues
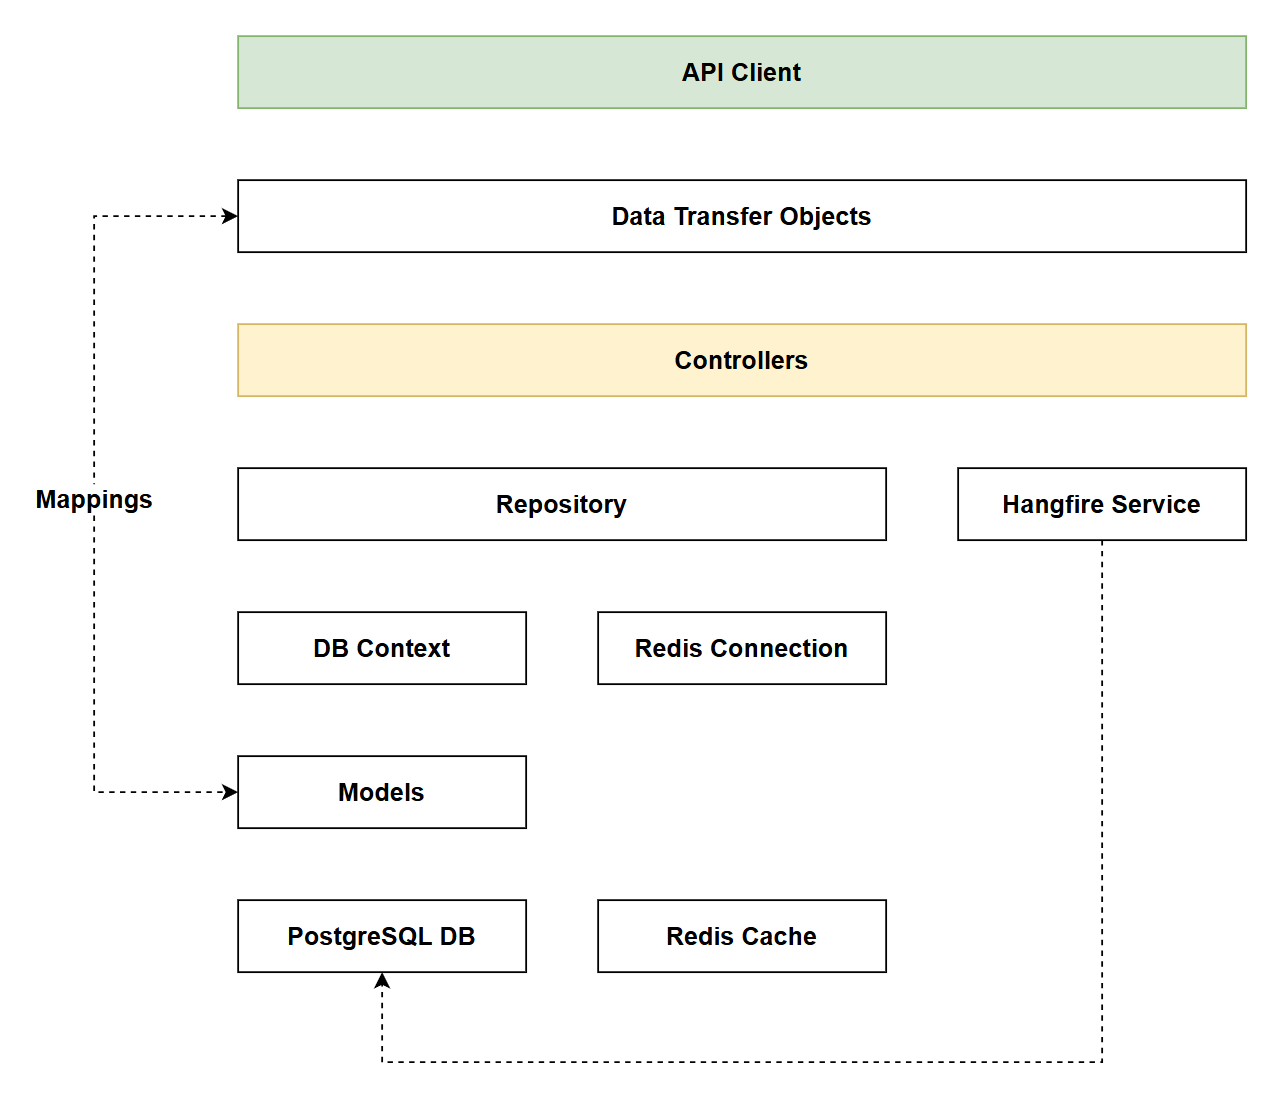
Architecture Checkpoint
In reference to our solution architecture, we'll be making code changes to the highlighted components in this chapter:
- API Client (complete)
- Controllers (partially complete)
- The code for this section can be found here on GitHub
- The complete finished code can be found here on GitHub
Feature branch
Ensure that main is current, then create a feature branch called: chapter_19_oauth, and check it out:
git branch chapter_19_oauth
git checkout chapter_19_oauth
If you can't remember the full workflow, refer back to Chapter 5
Chapter approach
Like the last chapter, this one also contains a lot of content. Again, as I want to keep it in the one chapter, I've broken it down in to implementation phases of which there are 3:
- Phase 1: Configuring Auth0
- Phase 2: API coding
- Phase 3: Client coding
What is OAuth?
OAuth (Open Authorization) is an industry-standard authorization framework that enables applications to obtain limited access to user accounts on an HTTP service. Despite its name focusing on "authorization," OAuth is commonly used to facilitate authentication flows as well.
The key concept: OAuth allows users to grant third-party applications access to their resources without sharing their passwords. Instead, users authenticate with a trusted identity provider (like Auth0, Google, Microsoft) and receive a token that proves their identity.
How OAuth differs from API Keys
In Chapter 18, we implemented API Key authentication, which works well for:
- System-to-system communication
- Long-lived credentials
- Service accounts
OAuth, by contrast, is designed for:
- User authentication: verifying the identity of human users
- Interactive login flows: users enter credentials in a secure browser interface
- Short-lived tokens: tokens expire after a set period (typically 1-24 hours)
- Delegated authorization: users can grant specific permissions to applications
- Single Sign-On (SSO): users authenticate once and access multiple applications
Why use OAuth?
Benefits of using OAuth, include, but are not limited to:
- No password storage: Your application never sees or stores user passwords
- Reduced attack surface: Password breaches can't compromise your database
- Industry best practices: OAuth 2.0 and OpenID Connect are battle-tested standards
- Token expiration: Short-lived tokens minimize the window of exposure if compromised
Auth0 as an Identity Provider
I've decided to use a 3rd party Identity Provider (Auth0) to help us implement OAuth. I've gone with a 3rd party for the following reasons:
- Complexity: Secure authentication is difficult to implement correctly
- Maintenance: Security standards evolve; Auth0 handles updates
- Features: Would take months/years to build equivalent functionality
- Cost-effective: Free tier is quite generous - and certainly sufficient for our purposes
How JWT fits in
JWT (JSON Web Token) is the token format that OAuth 2.0 implementations typically use to represent authentication and authorization information.
The relationship:
- OAuth 2.0 = The authorization framework (the "protocol")
- OpenID Connect = Authentication layer built on top of OAuth 2.0
- JWT = The token format used to transmit claims securely
How OAuth works
Before we dive into the implementation, let's walk through how OAuth actually works in the context of what we'll be building. Understanding this flow will make the code we write make much more sense.
The players:
- User: The person using our JavaScript SPA in their browser
- Client (SPA): Our JavaScript application running in the browser
- Authorization Server: Auth0 (the identity provider)
- Resource Server: Our .NET API
The flow (Authorization Code Flow with PKCE):
-
User clicks "Login"
- Our SPA redirects the user to Auth0's login page
- The redirect URL includes:
client_id,redirect_uri,audience, and PKCE parameters- PKCE (Proof Key for Code Exchange) - A security extension that prevents authorization code theft.
- The user is now on Auth0's domain, not ours
-
User authenticates with Auth0
- User enters their credentials on Auth0's secure login page
- Auth0 verifies the credentials (we never see the password!)
- If this is the first time, Auth0 asks the user to authorize our app
-
Auth0 redirects back to our app
- Auth0 redirects the browser back to our SPA with an authorization
code - This code is short-lived and can only be used once
- The URL looks like:
https://localhost:7276/?code=abc123&state=xyz
- Auth0 redirects the browser back to our SPA with an authorization
-
SPA exchanges code for tokens
- The Auth0 SDK automatically exchanges the authorization code for tokens
- Auth0 returns two tokens:
- Access Token (JWT) - Used to call our API
- ID Token (JWT) - Contains user information
- These tokens are stored in memory by the Auth0 SDK
-
SPA calls our API with the access token
- When creating an API key, the SPA retrieves the access token
- It includes the token in the Authorization header:
Bearer <token> - The SPA sends:
POST /api/registrationswith the token
-
API validates the token
- Our .NET API receives the request with the Bearer token
- The JWT Bearer middleware extracts the token from the Authorization header
- It downloads Auth0's public keys (cached after first request)
- It validates:
- The token signature (using Auth0's public key)
- The token hasn't expired
- The audience claim matches our API identifier
- The issuer is our Auth0 domain
-
API processes the authenticated request
- If validation succeeds, the API extracts user information from the token
- The
user.subclaim contains the unique user ID from Auth0 - The API creates the API key tied to that authenticated user
- It returns the newly created API key to the SPA
Why this is secure:
- No password exposure: The SPA never sees the user's password
- Time-limited tokens: Access tokens expire (typically after 24 hours)
- Signature verification: The API cryptographically verifies tokens came from Auth0
- Audience validation: Tokens are bound to our specific API, preventing replay attacks
- PKCE: Protects against authorization code interception attacks
In our implementation:
The Auth0 SDK handles most of the complexity automatically:
loginWithRedirect()initiates steps 1-3handleRedirectCallback()completes step 4getTokenSilently()retrieves the access token for step 5AddJwtBearer()in our API handles step 6
This is why OAuth with Auth0 is powerful - we get enterprise-grade security without implementing the cryptographic complexity ourselves.
Ok, enough with the theory: let's start implementing.
Phase 1: Configure Auth0
API Endpoints
Before we get started with the configuration in Auth0, we need to note down the 2 endpoints the API starts on (https and http). To do this, expand the Properties folder and open launchSettings.json. Make a note of both of the endpoints being used.
In my case this would be:
These 2 bits of information are critical to the correct configuration of: Auth0, the .NET API, and the JavaScript SPA. Please ensure you are using the correct values.
Create a SPA app
If you've not done so already sign up for an Auth0 account and login.
In Phase 3 we'll be creating a JavaScript Single Page App (SPA) to allow us do the following:
- Login to Auth0 - this will give us a JWT token.
- Use the JWT token make an authenticated call to the
RegisterKeyendpoint - creating an API key
In order for the SPA app to allow us to authenticate through Auth0 we need to configure a client app in Auth0 - we'll cover that configuration in this phase.
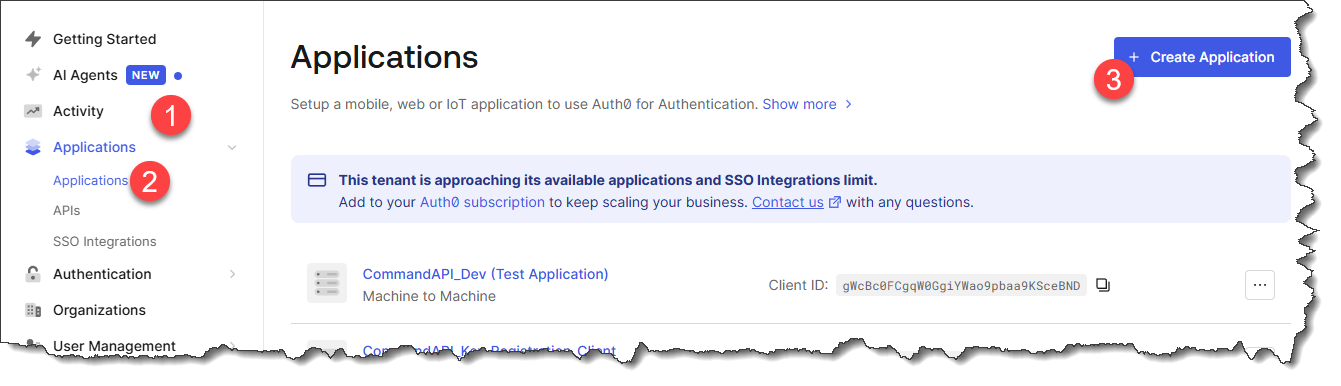
Login to Auth0 and:
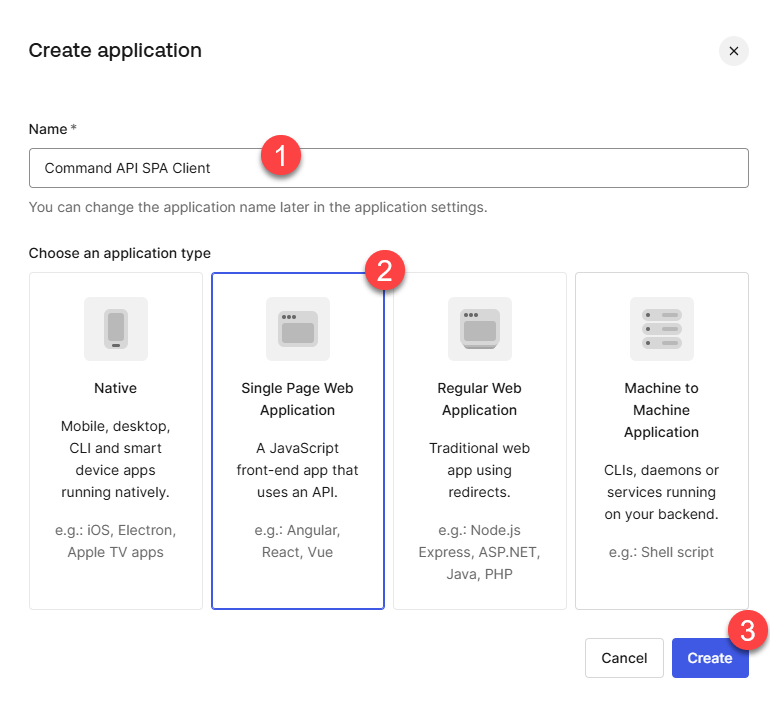
- Expand Applications -> Select Applications -> Select: Create Application
- On the Create application screen: enter a name for your app -> select Single Page Web Application -> Select Create
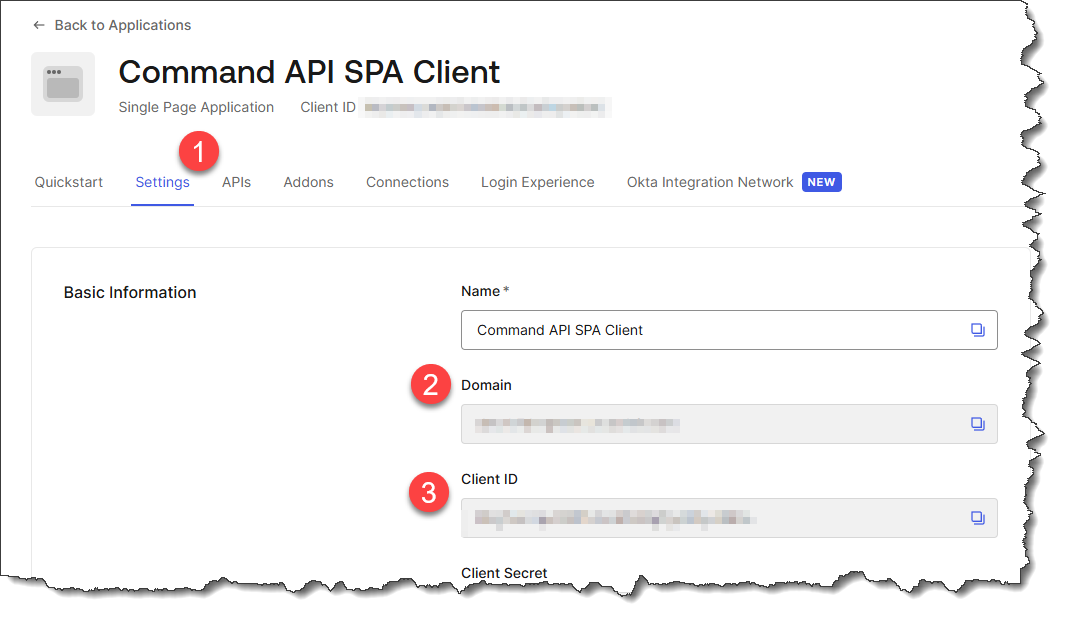
- Click the Settings tab on the SPA config screen, and make a note of the following details:
- Domain
- Client ID
Set these aside for later.
-
Remaining in the Settings tab, scroll down to Application URLs - we're going to populate the following sections with the details of our API endpoints:
- Allowed Callback URLs: Where Auth0 redirects users after successful authentication. Only URLs listed here can receive authentication tokens, preventing malicious redirect attacks.
- Allowed Logout URLs: Where Auth0 redirects users after they log out. This ensures users land on a legitimate page in your application after logout.
- Allowed Web Origins: Origins allowed to make Cross-Origin requests to Auth0 from the browser. This enables your SPA to communicate with Auth0's authentication endpoints.
Taking my 2 API endpoints as an example:
We'll populate each of the 3 sections identified above with:
https://localhost:7276, https://127.0.0.1:7276, http://localhost:5181, http://127.0.0.1:5181
This is a comma separated list of both endpoints (http and https) expressed using both of the following local host name formats:
localhost127.0.0.1
An example of my completed config is shown below:
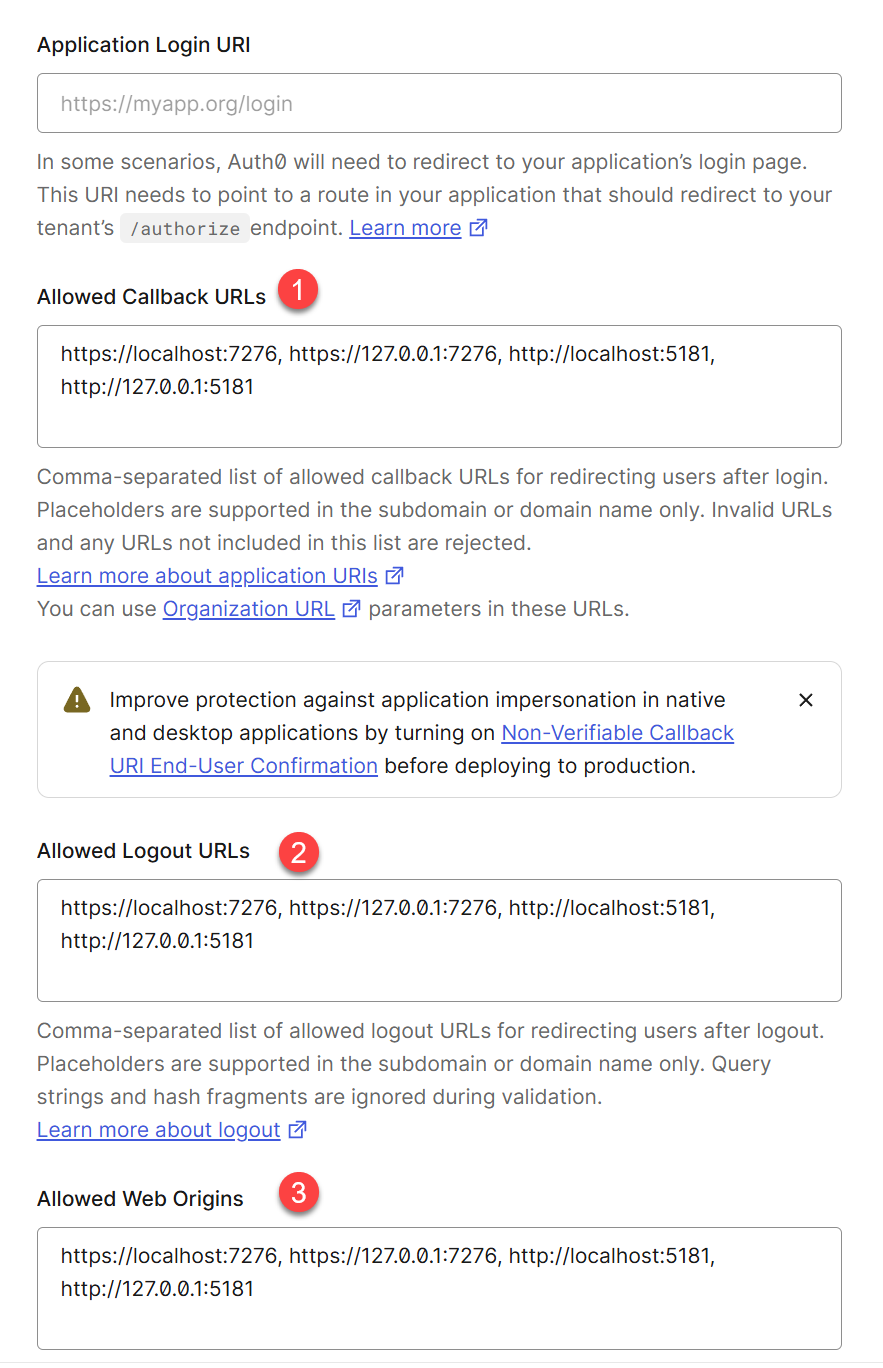
Be sure to save your settings.
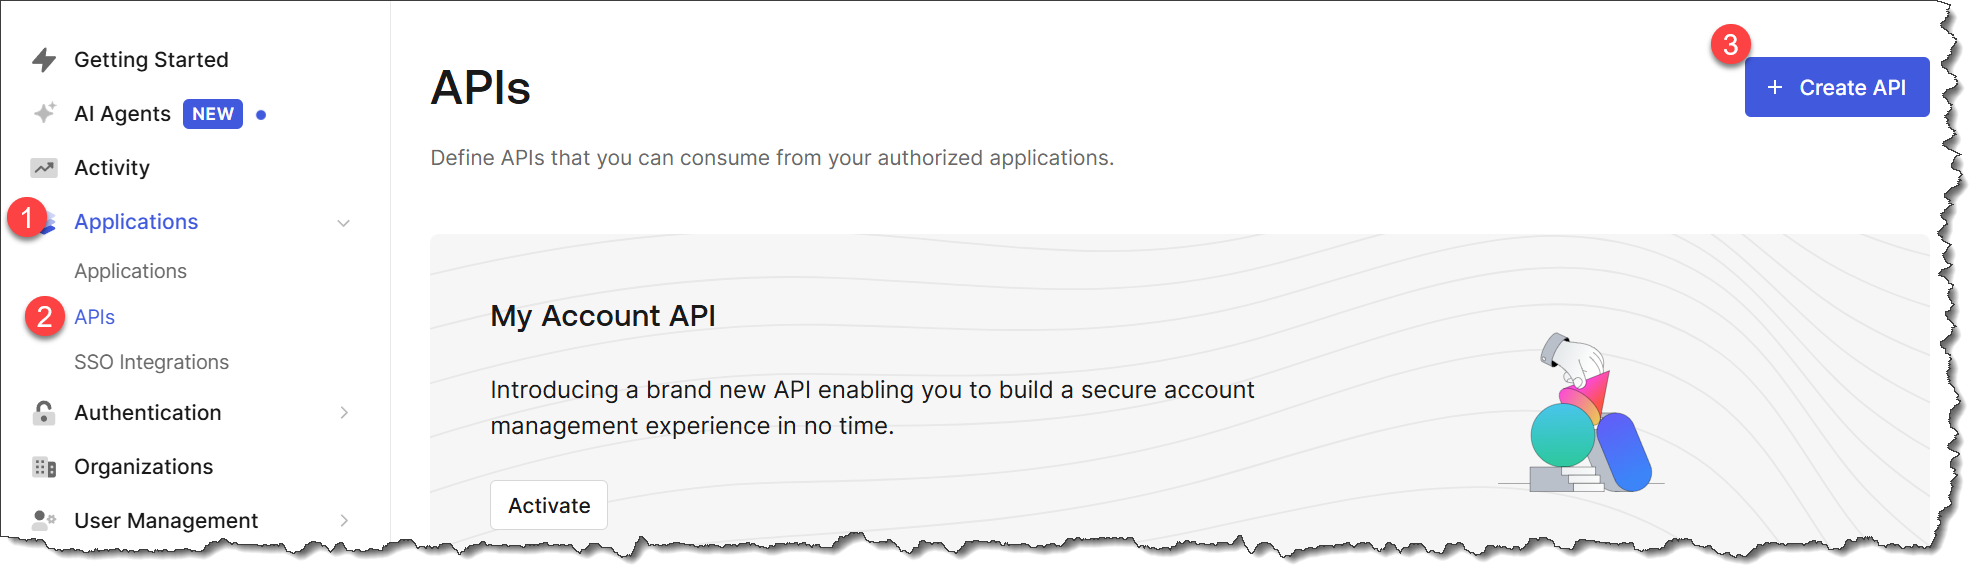
Create an API
The 2nd thing we need to create in Auth 0 is an API - this just allows the .NET API to identify and register itself to Auth0, as it too will be participating in the authentication flow.
Returning back to the main Auth0 dashboard: expand Applications -> select APIs -> select Create API:
On the resulting screen, in the General Settings section:
- Name the API
- Provide an Identifier: this will be used as the
audiencevalue later - so set it aside for now- This value needs to be the host name for your API endpoint.
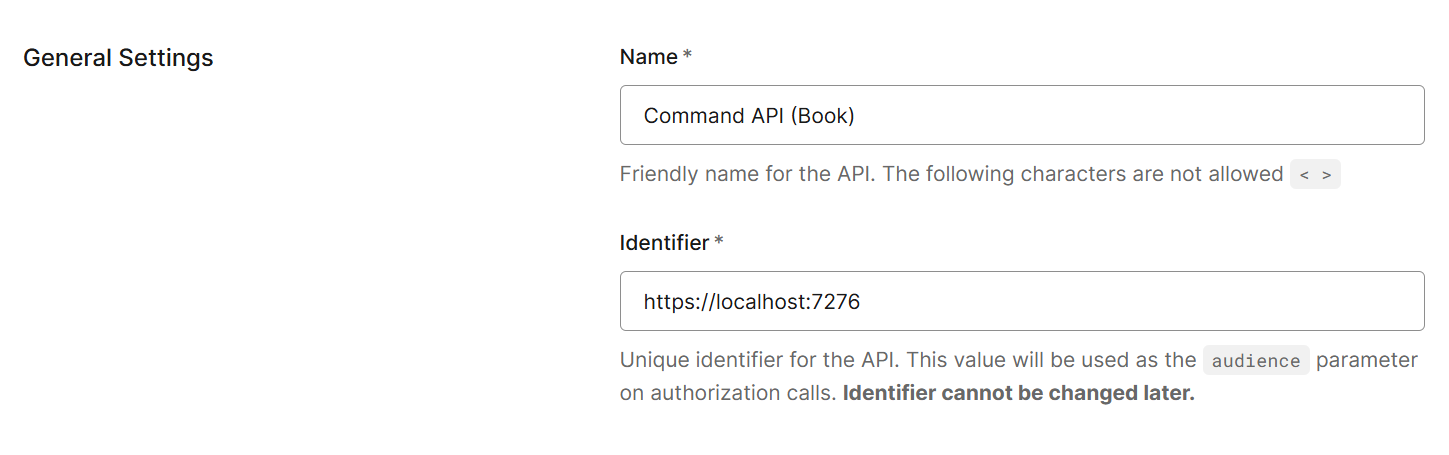
Save off your API.
Authorize API use
We now need to authorize the SPA to use the API. We do this by going back to the main Auth0 dashboard and: select Applications -> select Applications - > select your SPA app from the list:
On the resulting screen, select APIs -> then select Edit next to the API you created in the last section (assuming that it's not already authorized):
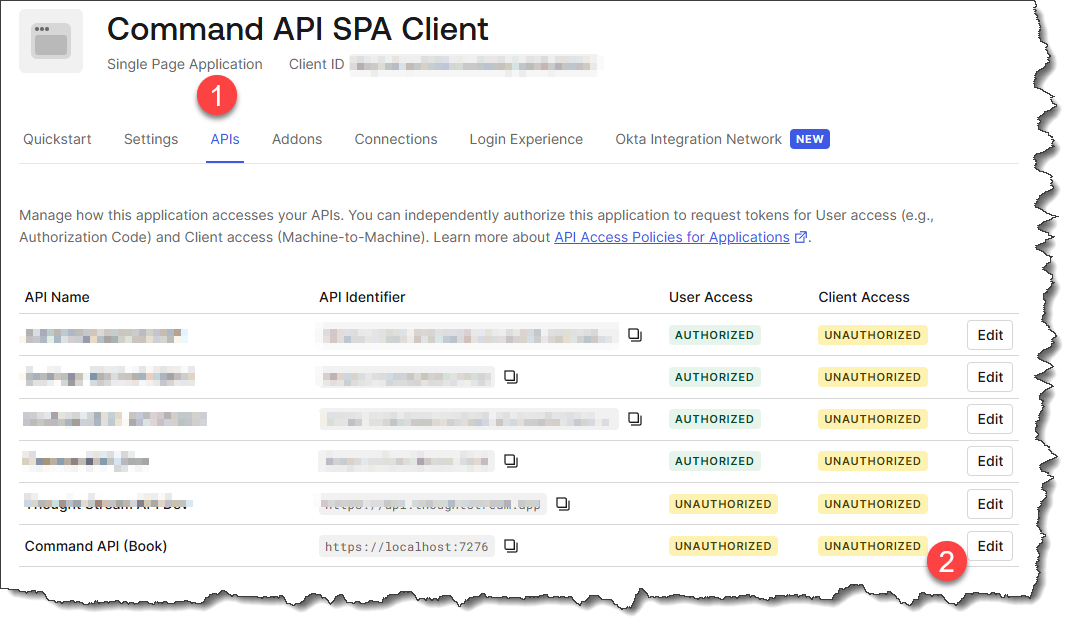
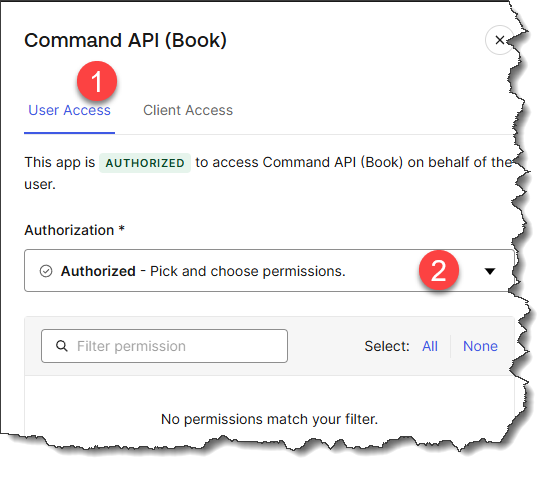
Select User Access -> then select Authorized from the drop-down, before selecting Save
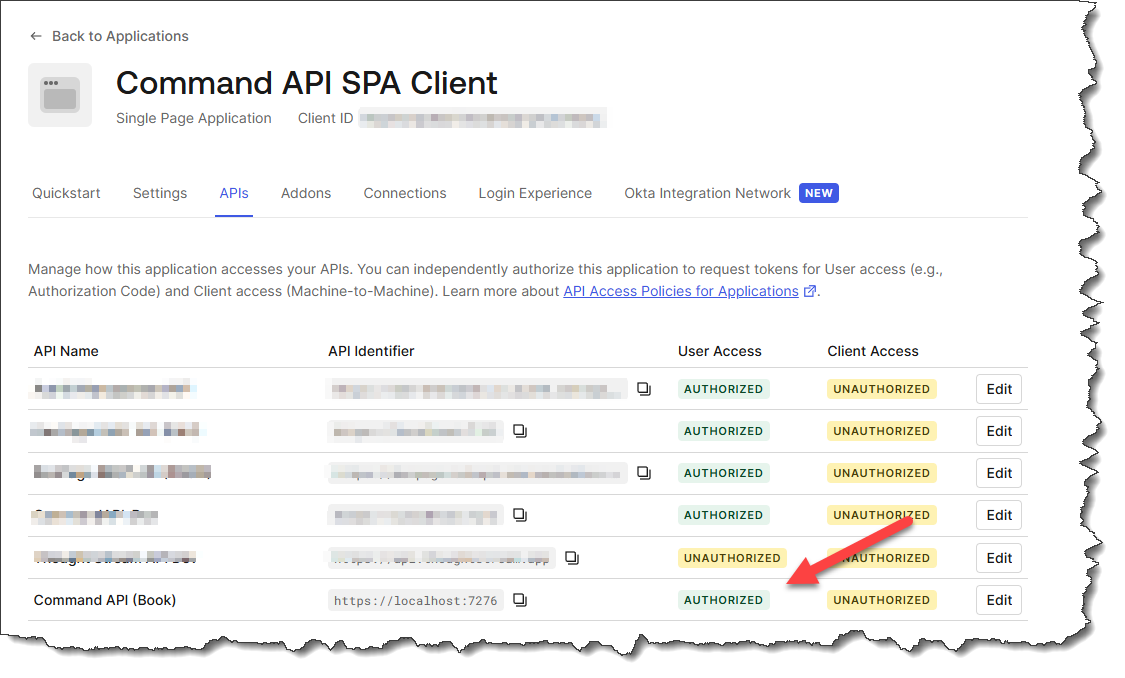
Validate that the SPA is authorized to use the API:
Create a user
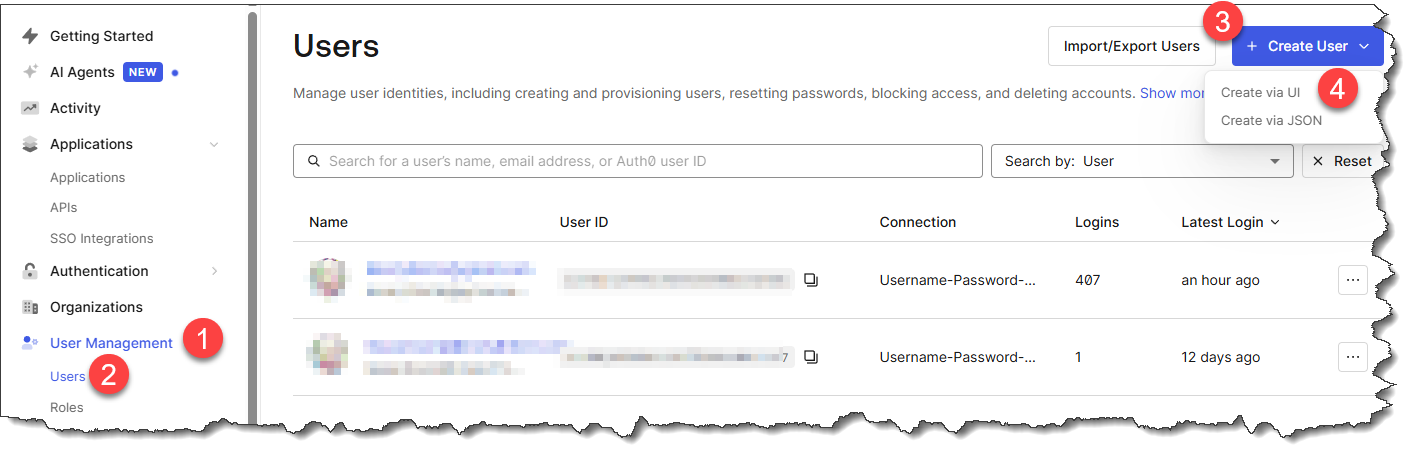
Auth0 supports user sign up as well as login, however we're not going to implement a sign up flow simply because I feel it's too far outside the scope of the book (user sign up would not touch the .NET API in anyway). To that end we'll create a test user manually in Auth0 so that we can test authentication flow.
In the main Auth0 dashboard: select User Management -> select Users -> Create User -> Create via UI
On the resulting screen select Username-Password-Authentication from the dropdown, then fill out the other fields as needed:

Click Create when done
Review
Just to review this phase you should now have the following pieces of config which will be used to configure the API and the Client app as well as test the authentication flow:
Configuration:
- Domain
- Client ID
- Audience (the API Identifier)
Testing:
- Username
- Password
Phase 2: API
We turn our attention now to updating the API to make use of OAuth authentication via Auth0 as a provider.
Package reference
First thing we need to do is add a new package:
dotnet add package Microsoft.AspNetCore.Authentication.JwtBearer
Configuration
Next we want to add the following 2 configuration values obtained in the last section to the .NET configuration:
- Domain (aka the Authority)
- Audience (the API Identifier)
We'll do this using User Secrets, as these pieces of information are sensitive, and I don't want potentially expose them in Git / GitHub:
dotnet user-secrets set "Auth0:Authority" "https://<YOUR DOMAIN VALUE>"
dotnet user-secrets set "Auth0:ApiIdentifier" "https://localhost:7276"
Check, double-check then triple-check that anytime you are applying config, that you are using the correct values.
There is so much to this section, that it is very easy to make a mistake that will tangle you up later. A little bit of care now, can save a whole bunch of effort later.
Service registration
Next we need to update Program.cs to reflect that we're going to be use JWT tokens (via Auth0) as well as API Keys, first add the following using statement:
using Microsoft.AspNetCore.Authentication.JwtBearer;
Then update the service registration for Authentication as follows:
builder.Services.AddAuthentication(opt =>
{
    opt.DefaultAuthenticateScheme = JwtBearerDefaults.AuthenticationScheme;
    opt.DefaultChallengeScheme = JwtBearerDefaults.AuthenticationScheme;
})
    .AddJwtBearer(opt =>
    {
        opt.Authority = builder.Configuration["Auth0:Authority"];
        opt.Audience = builder.Configuration["Auth0:ApiIdentifier"];
    })
    .AddScheme<AuthenticationSchemeOptions, ApiKeyAuthenticationHandler>("ApiKey", null);
This code:
- Sets JWT Bearer as default: Configures JWT Bearer authentication as the default authentication and challenge scheme for the API
- Configures Auth0 validation: The
Authorityparameter tells the API where Auth0 is hosted, allowing it to retrieve the public keys needed to validate JWT token signatures - Validates token audience: The
Audienceparameter ensures that incoming JWT tokens were specifically issued for this API (prevents tokens meant for other APIs from being accepted) - Maintains dual authentication: Keeps the existing API key authentication scheme alongside OAuth, allowing the API to support both authentication methods
The result is that controllers can now use either authentication scheme by specifying [Authorize(AuthenticationSchemes = "Bearer")] for OAuth or [Authorize(AuthenticationSchemes = "ApiKey")] for API key authentication.
DTO
We will be obtaining the UserId value required when we create the API key registration in the database directly from the JWT token, so we do not need to retain it in the DTO. Open KeyRegistrationCreateDto and remove the UserId property, the DTO should look like this:
namespace CommandAPI.Dtos;

public record KeyRegistrationCreateDto
{
    public required string Description { get; init; }
};
Validator
Same point as above, as we don't need the UserId property in the DTO, we no longer need it in the validator. Open KeyRegistrationMutateDtoValidator and update it to look as follows:
using FluentValidation;

namespace CommandAPI.Validators;

public class KeyRegistrationMutateDtoValidator : AbstractValidator<Dtos.KeyRegistrationCreateDto>
{
    public KeyRegistrationMutateDtoValidator()
    {
        RuleFor(x => x.Description)
            .NotNull()
            .WithMessage("Description is required");
    }
}
Controller
We now want to secure the entire Registrations Controller with Bearer authentication (i.e. a user has authenticated via Auth0 using OAuth and have a valid JWT token).
First add the following 2 using statements to RegistrationsController.cs:
using Microsoft.AspNetCore.Authorization;
using Microsoft.AspNetCore.Authentication.JwtBearer;
Now decorate the RegistrationsController class as follows:
// .
// .
// .
// Existing code

[Route("api/[controller]")]
[ApiController]
[Authorize(AuthenticationSchemes = JwtBearerDefaults.AuthenticationScheme)]
public class RegistrationsController : ControllerBase
{
    private readonly IRegistrationRepository _regoRepo;
    private readonly ILogger<RegistrationsController> _logger;

// Existing code
// .
// .
// .
This requires that all endpoints within RegistrationsController are authenticated using the Bearer scheme.
We also want to source the UserId directly from the JWT token (as opposed to the DTO as this is more secure), so add the highlighted code to the RegisterKey method:
// .
// .
// .
// Existing code

[HttpPost]
public async Task<ActionResult> RegisterKey([FromBody] KeyRegistrationCreateDto keyRegistrationCreateDto)
{
    // Log all claims for debugging
    _logger.LogInformation("JWT Claims: {Claims}", string.Join(", ", User.Claims.Select(c => $"{c.Type}={c.Value}")));

    // Extract the user ID from the JWT token (more secure than client-provided value)
    // ASP.NET Core maps the JWT "sub" claim to ClaimTypes.NameIdentifier
    var userId = User.FindFirst(ClaimTypes.NameIdentifier)?.Value;

    if (string.IsNullOrEmpty(userId))
    {
        _logger.LogWarning("User ID not found in JWT token. Available claims: {Claims}",
            string.Join(", ", User.Claims.Select(c => c.Type)));
        return Unauthorized(new { message = "User ID not found in authentication token" });
    }

    _logger.LogInformation("Registering new API key for user: {UserId}", userId);

    // Step 1: Generate random index (36 chars when converted to string)
    var keyIndex = Guid.NewGuid();

// Existing code
// .
// .
// .
Finally make use of the sourced userId (above) when registering the API key registration in the DB:
// .
// .
// .
// Existing code

// Step 6: Store index, salt, and hash (never store plaintext key)
KeyRegistration keyRego = new()
{
    KeyIndex = keyIndex,
    Salt = salt,
    KeyHash = keyHash,
    Description = keyRegistrationCreateDto.Description,
    UserId = userId
};

// Existing code
// .
// .
// .
Exercising
Save everything off, ensure you have a clean build, then run the API.
We can now test that OAuth has been set up correctly by re-attempting to generate an API key by calling the RegisterKey endpoint in the RegistrationsController.
We had the following request from last time:
# Register a new API key
POST {{baseUrl}}/api/Registrations HTTP/1.1
Content-Type: application/json

{
    "userId": "hardcode until we have OAuth",
    "description": "from requests"
}
This should now return a 401 Unauthorized response, noting the value for WWW-Authenticate is Bearer:
HTTP/1.1 401 Unauthorized
Content-Length: 0
Connection: close
Date: Wed, 18 Feb 2026 10:03:19 GMT
Server: Kestrel
WWW-Authenticate: Bearer
Phase 3: Client build
The last step is to create a JavaScript client app that will allow us to:
- Login via Auth0
- Create an API Key
The idea is that this app mirrors the type of portal you'd find in many SaaS apps where you can create API keys to allow integration with other systems.
Enable static files
To start with, we'll host the client app in the same project as our API. To enable this we need to be able to serve static files from the API project. Open Program.cs, and add the following middleware (UseDefaultFile and UseStaticFiles) to our pipeline:
app.UseMiddleware<GlobalExceptionHandlerMiddleware>();

// Serilog request logging
app.UseSerilogRequestLogging();

if (app.Environment.IsDevelopment())
{
    app.MapOpenApi();
}

app.UseHttpsRedirection();

app.UseDefaultFiles();
app.UseStaticFiles();

app.UseAuthentication();
app.UseAuthorization();

app.MapControllers();

app.Run();
This code:
- UseDefaultFiles() - Enables serving default files (like
index.html) when a directory is requested. When users navigate to the root URL (/), this middleware rewrites the request to look for default documents - UseStaticFiles() - Enables serving static files (HTML, CSS, JavaScript, images) from the
wwwrootfolder. This allows the API to host the JavaScript SPA we'll create
Order matters: UseDefaultFiles must come before UseStaticFiles because it needs to rewrite the URL path before the static file middleware attempts to serve the file.
In the root of the API project create a folder called: wwwroot this is where the static assets for the JavaScript app will reside.
.gitignore
Our client will need to make use of the config elements we gathered from Auth0, and we do not want to commit those details to version control (Git / GitHub). To that end we'll need to exclude the config.js file we'll create next by ensuring there is an entry in the .gitignore file.
Open .gitignore and ensure there is an entry as follows:
# Auth0 client configuration (contains sensitive credentials)
wwwroot/js/config.js
Client config
Next inside the wwwroot folder create a folder called js, then inside that create a file called config.js and populate it as follows:
// Auth0 Configuration
// DO NOT COMMIT THIS FILE - Add to .gitignore
const AUTH0_CONFIG = {
    domain: "<YOUR DOMAIN>",
    clientId: "<YOUR CLIENT ID>",
    audience: "https://localhost:7276"
};
As this file will not be committed to Git / GitHub, other developers wanting to use the code will need a template config file to base their config.js file off of. So also in the js folder create a file called: config.example.js and populate it as follows:
// Auth0 Configuration Template
// Copy this file to config.js and fill in your Auth0 credentials
const AUTH0_CONFIG = {
    domain: "your-tenant.auth0.com",
    clientId: "your-client-id",
    audience: "your-api-audience"
};
CSS
I'll come right out with it and say that I'm hopeless with Cascading Style Sheets (CSS). I'm very much a backend developer. This is one area where I totally relied upon an AI coding agent to help, it generated all the CSS for our app.
Before we get to that though, in wwwroot, create a folder called css, then create a file called styles.css and paste in the AI generated CSS:
* {
    margin: 0;
    padding: 0;
    box-sizing: border-box;
}

body {
    font-family: 'Segoe UI', Tahoma, Geneva, Verdana, sans-serif;
    background: linear-gradient(135deg, #667eea 0%, #764ba2 100%);
    min-height: 100vh;
    padding: 20px;
}

#container {
    max-width: 800px;
    margin: 0 auto;
    background: white;
    border-radius: 15px;
    box-shadow: 0 10px 40px rgba(0, 0, 0, 0.2);
    overflow: hidden;
}

header {
    background: linear-gradient(135deg, #667eea 0%, #764ba2 100%);
    padding: 30px;
    display: flex;
    justify-content: space-between;
    align-items: center;
    flex-wrap: wrap;
    gap: 15px;
}

#app-name {
    color: white;
    font-size: 2em;
    font-weight: bold;
    text-shadow: 2px 2px 4px rgba(0, 0, 0, 0.2);
}

.auth-buttons {
    display: flex;
    gap: 10px;
}

.btn {
    padding: 10px 25px;
    border: none;
    border-radius: 25px;
    font-weight: bold;
    font-size: 14px;
    cursor: pointer;
    transition: all 0.3s ease;
    box-shadow: 0 4px 6px rgba(0, 0, 0, 0.1);
}

#login {
    background: white;
    color: #667eea;
}

#login:hover {
    background: #f0f0f0;
    transform: translateY(-2px);
    box-shadow: 0 6px 12px rgba(0, 0, 0, 0.15);
}

#logout {
    background: #ff4757;
    color: white;
}

#logout:hover {
    background: #ff3838;
    transform: translateY(-2px);
    box-shadow: 0 6px 12px rgba(255, 71, 87, 0.4);
}

.btn:disabled {
    opacity: 0.6;
    cursor: not-allowed;
}

#main-app {
    padding: 30px;
    min-height: 100px;
}

#create-key-section {
    padding: 30px;
    background: #f8f9fa;
    visibility: hidden;
}

#create-key-section.visible {
    visibility: visible;
}

#create-api-key-form {
    display: flex;
    flex-direction: column;
    gap: 15px;
    max-width: 500px;
    margin: 0 auto;
}

#create-api-key-form h3 {
    color: #333;
    margin-bottom: 10px;
    text-align: center;
}

#key-holder-name {
    padding: 15px;
    border: 2px solid #ddd;
    border-radius: 8px;
    font-size: 16px;
    transition: border-color 0.3s ease;
}

#key-holder-name:focus {
    outline: none;
    border-color: #667eea;
}

#create-api-key {
    background: linear-gradient(135deg, #667eea 0%, #764ba2 100%);
    color: white;
    padding: 15px 30px;
    font-size: 16px;
}

#create-api-key:hover {
    transform: translateY(-2px);
    box-shadow: 0 6px 12px rgba(102, 126, 234, 0.4);
}

#created-key-section {
    padding: 30px;
    min-height: 50px;
}

#api-key {
    padding: 20px;
    background: #e7f3ff;
    border-left: 4px solid #667eea;
    border-radius: 5px;
    color: #333;
    font-family: 'Courier New', monospace;
    word-break: break-all;
    display: none;
}

#api-key.show {
    display: block;
    animation: slideIn 0.3s ease;
}

.key-display {
    font-family: 'Segoe UI', Tahoma, Geneva, Verdana, sans-serif;
}

.key-display h4 {
    color: #28a745;
    margin-bottom: 15px;
    font-size: 1.2em;
    display: flex;
    align-items: center;
    gap: 8px;
}

.key-value {
    background: white;
    padding: 15px;
    border-radius: 8px;
    border: 2px solid #667eea;
    margin-bottom: 15px;
    display: flex;
    flex-direction: column;
    gap: 10px;
}

.key-value label {
    font-weight: bold;
    color: #667eea;
    font-size: 0.9em;
}

.key-value code {
    background: #f8f9fa;
    padding: 12px;
    border-radius: 5px;
    font-size: 0.85em;
    word-break: break-all;
    color: #333;
    border: 1px solid #ddd;
}

.copy-btn {
    align-self: flex-start;
    background: #667eea;
    color: white;
    border: none;
    padding: 8px 20px;
    border-radius: 5px;
    cursor: pointer;
    font-weight: bold;
    font-size: 0.9em;
    transition: all 0.3s ease;
}

.copy-btn:hover {
    background: #5568d3;
    transform: translateY(-1px);
}

.key-message {
    background: #fff3cd;
    border: 1px solid #ffc107;
    padding: 12px;
    border-radius: 5px;
    color: #856404;
    font-size: 0.9em;
    display: flex;
    align-items: center;
    gap: 8px;
}

.warning-icon {
    font-size: 1.2em;
}

@keyframes slideIn {
    from {
        opacity: 0;
        transform: translateY(-10px);
    }
    to {
        opacity: 1;
        transform: translateY(0);
    }
}

/* Message styles */
.message {
    padding: 15px 20px;
    border-radius: 8px;
    margin: 20px 30px;
    display: none;
    align-items: center;
    gap: 10px;
    font-weight: 500;
    animation: slideIn 0.3s ease;
}

.message.show {
    display: flex;
}

.message-success {
    background: #d4edda;
    border-left: 4px solid #28a745;
    color: #155724;
}

.message-error {
    background: #f8d7da;
    border-left: 4px solid #dc3545;
    color: #721c24;
}

.message-icon {
    font-size: 20px;
}

.message-text {
    flex: 1;
}

.message-close {
    background: none;
    border: none;
    font-size: 20px;
    cursor: pointer;
    color: inherit;
    opacity: 0.7;
    padding: 0;
    width: 24px;
    height: 24px;
    display: flex;
    align-items: center;
    justify-content: center;
}

.message-close:hover {
    opacity: 1;
}

hr {
    border: none;
    border-top: 1px solid #eee;
    margin: 0;
}

/* Responsive design */
@media (max-width: 600px) {
    header {
        flex-direction: column;
        text-align: center;
    }

    #app-name {
        font-size: 1.5em;
    }

    .auth-buttons {
        justify-content: center;
        width: 100%;
    }

    #create-api-key-form {
        padding: 0 20px;
    }
}

/* Hidden class for toggling visibility */
.hidden {
    display: none !important;
}
I'm not even going to describe what this does - it simply applies styles to HTML elements!
HTML
Next up, we'll create the primary vehicle for the app - the index.html file. Place this directly in wwwroot and populate as follows:
<!DOCTYPE html>
<html lang="en">

<head>
    <meta charset="UTF-8">
    <meta http-equiv="X-UA-Compatible" content="IE=edge">
    <meta name="viewport" content="width=device-width, initial-scale=1.0">
    <link rel="stylesheet" href="css/styles.css">
    <title>Command API</title>
</head>

<body>
    <div id="container">
        <header>
            <h1 id="app-name">CommandAPI</h1>
            <div class="auth-buttons">
                <button class="btn" id="login">Login</button>
                <button class="btn hidden" id="logout">Logout</button>
            </div>
        </header>

        <!-- Message container -->
        <div id="message-container"></div>

        <hr>
        <div id="main-app">
            <p></p>
        </div>

        <div id="create-key-section">
            <form id="create-api-key-form">
                <h3>Generate API Key</h3>
                <input type="text" id="key-holder-name" placeholder="Enter Key Holder Name" required />
                <button type="submit" class="btn" id="create-api-key">Create API Key</button>
            </form>
        </div>

        <div id="created-key-section">
            <p id="api-key"></p>
        </div>
        <hr>
    </div>


</body>

</html>

<script src="https://cdn.auth0.com/js/auth0-spa-js/2.0/auth0-spa-js.production.js"></script>
<script src="js/config.js"></script>
<script src="js/ui.js"></script>
<script src="js/app.js"></script>
This code:
UI Elements:
- Header section: Contains the "CommandAPI" title and Login/Logout buttons (Logout is initially hidden)
- Message container: A div that will display success or error messages to users
- Main app section: Currently empty, but available for displaying user information or status
- Create key section: A form with an input field for entering a key holder name and a submit button to generate API keys
- Created key section: A div that will display the newly generated API key after creation
Included resources:
- styles.css: The CSS styling we created earlier
- Auth0 SPA SDK: The official Auth0 JavaScript library loaded from CDN for handling authentication
- config.js: Our Auth0 configuration (
domain,clientId,audience) - ui.js: UI helper functions for managing the interface
- app.js: Main application logic for authentication and API key generation
When we run everything you'll see that the actual authentication step is performed in Auth0, not our app, so other than the Login / Logout buttons, we host no UI elements of the login.
app.js
Next up we'll write the code for the main part of the client app covering:
- Authentication
- Calling the API to register an API key
In the js folder create a file called app.js and populate it as follows:
const loginButton = document.getElementById("login");
const logoutButton = document.getElementById("logout");
const fetchButton = document.getElementById('create-api-key');
const createKeySection = document.getElementById('create-key-section');
const keyHolderName = document.getElementById('key-holder-name');
const apiKey = document.getElementById('api-key');

let auth0Client = null;

const configureClient = async () => {
    auth0Client = await auth0.createAuth0Client({
        domain: AUTH0_CONFIG.domain,
        clientId: AUTH0_CONFIG.clientId,
        authorizationParams: {
            audience: AUTH0_CONFIG.audience
        }
    });
};

const login = async () => {
    try {
        console.log("Logging in");

        const options = {
            authorizationParams: {
                redirect_uri: window.location.origin
            }
        };

        await auth0Client.loginWithRedirect(options);
    } catch (err) {
        console.log("Log in failed", err);
    }
};


const createKey = async (e) => {
    e.preventDefault();

    const keyHolderInput = document.getElementById('key-holder-name');
    if (keyHolderInput.value.trim() === '') {
        console.log('-> Keyholder name not filled in');
        showMessage('Please fill out the Key holder name', 'error');
        return;
    }

    try {
        const token = await auth0Client.getTokenSilently();
        const user = await auth0Client.getUser();
        console.log('User:', user);

        const newKey = {
            Description: keyHolderName.value
        };
        try {
            const token = await auth0Client.getTokenSilently();

            fetch(AUTH0_CONFIG.audience + '/api/registrations/',
                {
                    method: 'POST',
                    headers: {
                        'Authorization': 'Bearer ' + token,
                        'Content-Type': 'application/json'
                    },
                    body: JSON.stringify(newKey)
                }) // The first promis we get back is the response object
                .then(res => {
                    if (!res.ok) {
                        //Error is thrown to the catch block
                        throw new Error('Http response was not ok');
                    }
                    // Parse JSON response
                    return res.json();
                })
                // data here has been passed through from the previous then, so this
                // equates to res.json()
                .then((data) => {
                    console.log(data);
                    // Format the API key display
                    apiKey.innerHTML = `
                        <div class="key-display">
                            <h4>✓ API Key Created Successfully</h4>
                            <div class="key-value">
                                <label>API Key:</label>
                                <code>${data.apiKey}</code>
                                <button class="copy-btn" onclick="copyToClipboard('${data.apiKey}')">Copy</button>
                            </div>
                            <div class="key-message">
                                <span class="warning-icon">⚠️</span>
                                ${data.message}
                            </div>
                        </div>
                    `;
                    apiKey.classList.add('show');
                    keyHolderName.value = '';
                    showMessage('API Key created successfully!', 'success');
                })
                .catch(err => {
                    console.error('Network Error: ', err);
                    showMessage('Failed to create API Key. Please try again.', 'error');
                });
        } catch (e) {
            console.error(e);
        }

    }
    catch (e) {
        console.error(e);
    }
};

window.onload = async () => {
    await configureClient();

    console.log('Client configured');

    const isAuthenticated = await auth0Client.isAuthenticated();

    if (isAuthenticated) {
        console.log('Authenticated');
        updateUI(isAuthenticated);
        return;
    }

    console.log('Not authenticated');
    updateUI(isAuthenticated);
    const query = window.location.search;
    const shouldParseResult = query.includes("code=") && query.includes("state=");

    if (shouldParseResult) {
        console.log("> Parsing redirect");
        try {
            const result = await auth0Client.handleRedirectCallback();
            if (result.appState && result.appState.targetUrl) {
                showContentFromUrl(result.appState.targetUrl);
            }
            console.log('Logged in!');
            updateUI(true);

        } catch (err) {
            console.log('Error parsing redirect:', err);
        }
        window.history.replaceState({}, document.title, "/");
    }
};


// Event Listeners
loginButton.addEventListener('click', (e) => {
    console.log('Attempting login');
    e.preventDefault();
    login();
});

logoutButton.addEventListener('click', (e) => {
    console.log('Attempting logout...');
    e.preventDefault();
    auth0Client.logout();
    showMessage('Logged out successfully', 'success');
});

document.querySelector('#create-api-key-form').addEventListener('submit', createKey);

// Copy to clipboard function
window.copyToClipboard = (text) => {
    navigator.clipboard.writeText(text).then(() => {
        showMessage('API Key copied to clipboard!', 'success');
    }).catch(err => {
        console.error('Failed to copy:', err);
        showMessage('Failed to copy to clipboard', 'error');
    });
};
This code:
- Configures the Auth0 client: Initializes the Auth0 SPA SDK with domain, clientId, and audience from config
- Handles login: Redirects users to Auth0's hosted login page when the login button is clicked
- Creates API keys: Retrieves JWT token from Auth0, extracts user ID, and makes authenticated POST request to the API's
/api/registrationsendpoint - Processes redirect callback: After Auth0 redirects back, parses the authentication result and updates UI
- Manages authentication state: On page load, checks if user is authenticated and updates UI accordingly (shows/hides login/logout buttons and key creation form)
- Handles logout: Logs user out through Auth0 when logout button is clicked
- Displays API key: Formats and shows the newly created API key with a copy-to-clipboard button
- Error handling: Shows user-friendly success/error messages for all operations
ui.js
We've split the UI augmentation code out to a separate file just to keep the main functional concerns (app.js) separate from the UI (ui.js). Create a file called ui.js in the js folder and update as follows:
const updateUI = async (isAuthenticated) => {
    try {
        console.log('Attempting to update the UI ' + isAuthenticated);
        if (isAuthenticated) {
            createKeySection.style.visibility = 'visible';
            loginButton.classList.add('hidden');
            logoutButton.classList.remove('hidden');
            return;
        }
        createKeySection.style.visibility = 'hidden';
        loginButton.classList.remove('hidden');
        logoutButton.classList.add('hidden');
    } catch (err) {
        console.log('error updating the UI', err);
        return;
    }
};

// Message utility functions
const showMessage = (message, type = 'success') => {
    const messageContainer = document.getElementById('message-container');
    const messageId = 'msg-' + Date.now();

    const messageDiv = document.createElement('div');
    messageDiv.id = messageId;
    messageDiv.className = `message message-${type}`;

    const icon = type === 'success' ? '✓' : '✕';

    messageDiv.innerHTML = `
        <span class="message-icon">${icon}</span>
        <span class="message-text">${message}</span>
        <button class="message-close" onclick="closeMessage('${messageId}')">×</button>
    `;

    messageContainer.appendChild(messageDiv);

    // Show with animation
    setTimeout(() => messageDiv.classList.add('show'), 10);

    // Auto-dismiss after 5 seconds
    setTimeout(() => closeMessage(messageId), 5000);
};

const closeMessage = (messageId) => {
    const message = document.getElementById(messageId);
    if (message) {
        message.classList.remove('show');
        setTimeout(() => message.remove(), 300);
    }
};

// Make closeMessage global for onclick handler
window.closeMessage = closeMessage;
This code:
- updateUI(): Toggles UI elements based on authentication state (shows/hides login/logout buttons and the API key creation form)
- showMessage(): Creates and displays styled success or error messages with icons that auto-dismiss after 5 seconds
- closeMessage(): Handles manual or automatic dismissal of messages with fade-out animation
These utility functions keep the UI synchronized with authentication state and provide user feedback for all operations performed in the app.
Save everything, and run up the API project that now includes our client.
Exercising
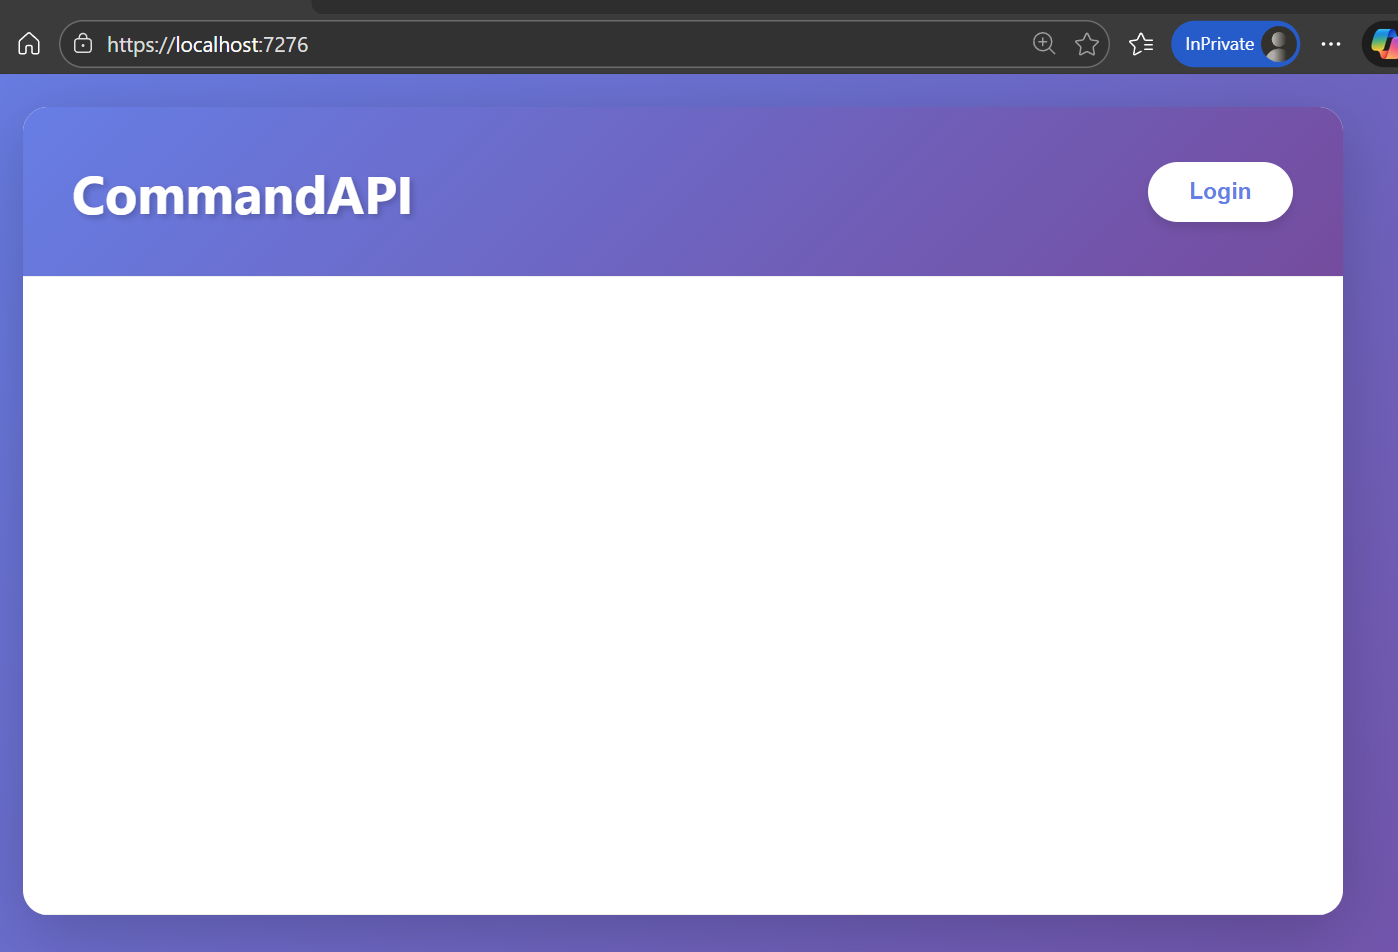
I'd start a "private" browsing window just to avoid any caching issues you may have with other logins that use Auth0 (there's a lot of them). Navigate to your host, in my case that's: https://localhost:7276/.
You should see something similar to the following:
If you don't see something approaching this, take a look at the Trouble shooting section where I've listed some things to try if things don't work.
Click the Login button and you should be taken to Auth0 to login - note we're now outside our app domain:
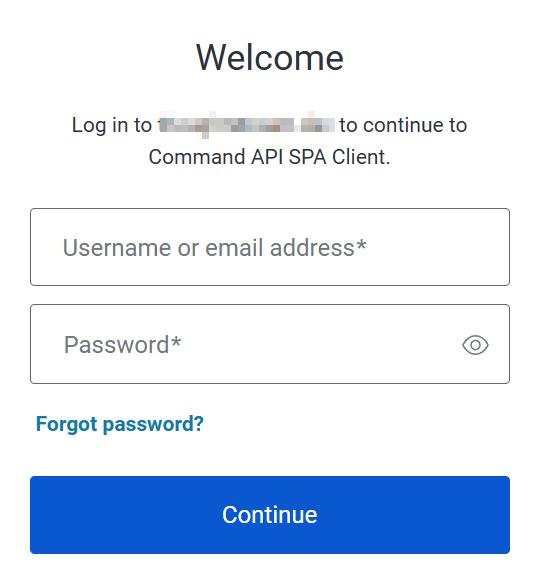
Enter the credentials you used to create the user in Auth0, and click Continue.
If this is the first time you're logging in you'll need to provide a 1-time authorization to link your account:
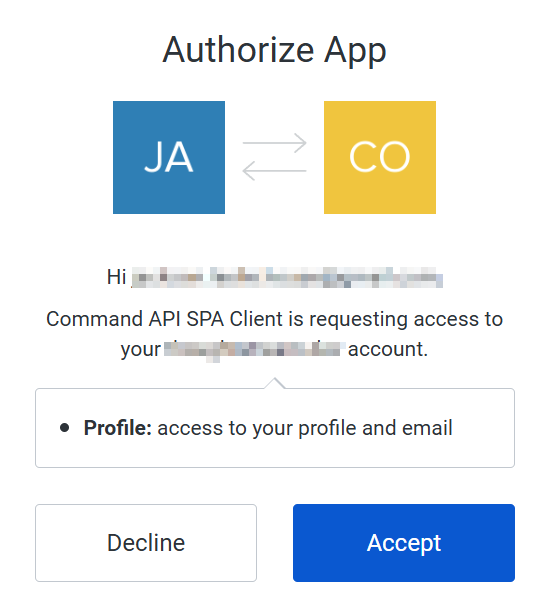
Click Accept to continue. This should log you in and present you with the ability to create an API Key:

Enter a description for an API Key (the UserId the API registration needs is derived from Auth0 now so we don't need to supply it here), and click Create API Key.
If all was successful you should see the following:
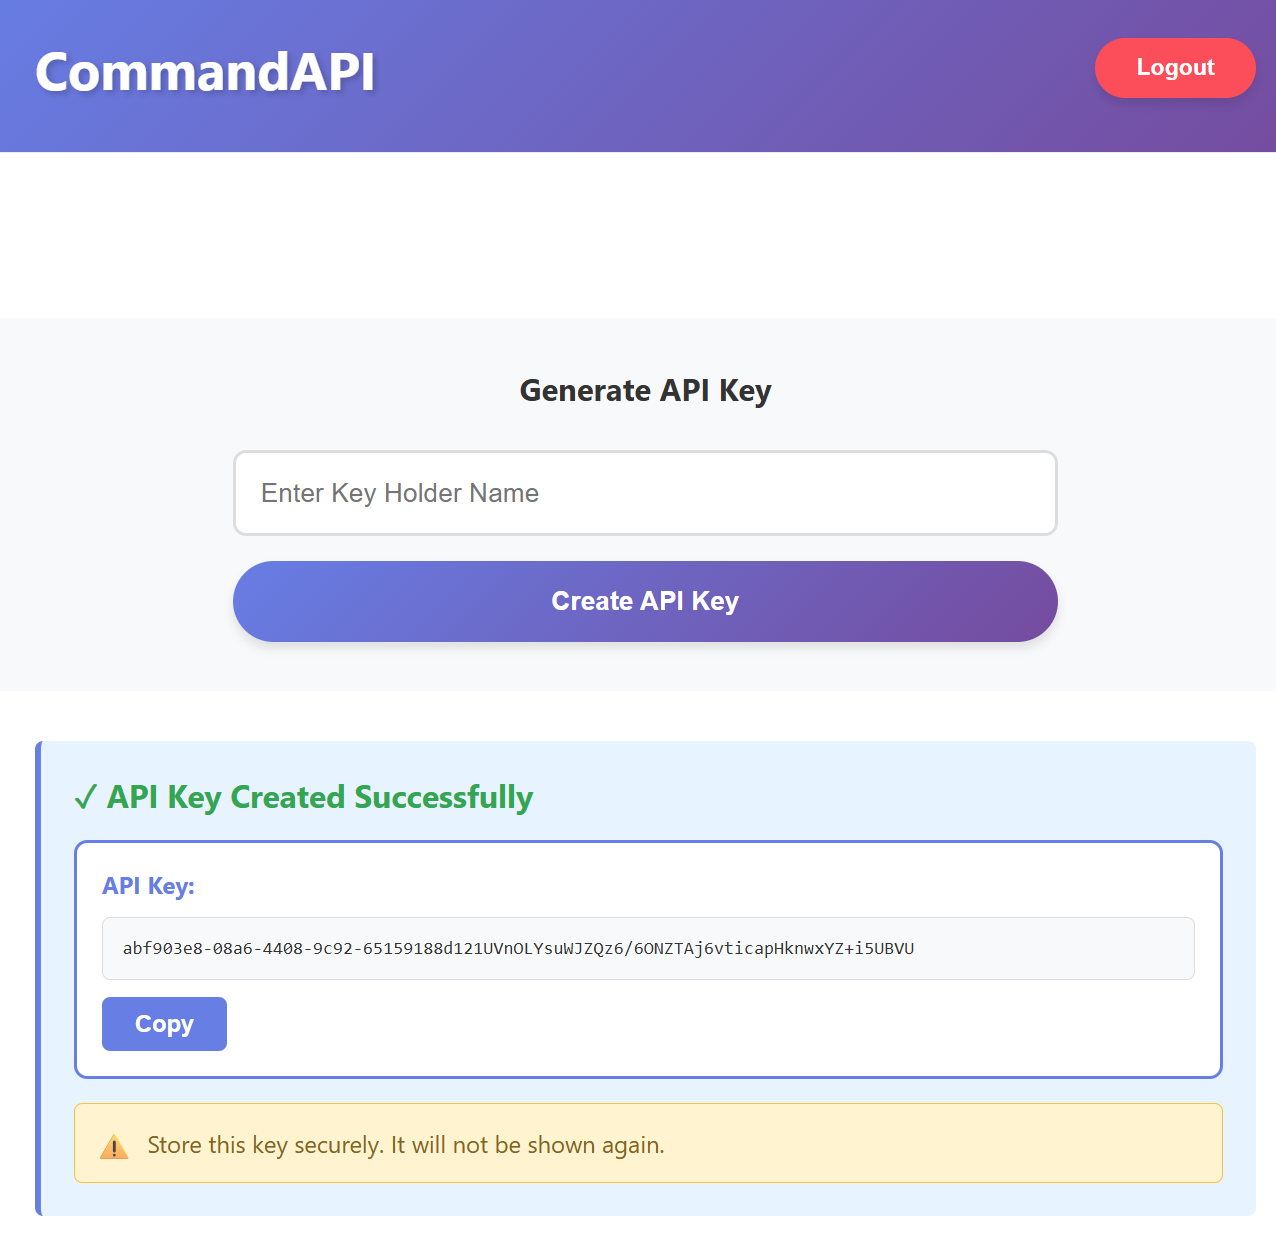
To round out the test copy the key that was returned and try it with a request, e.g. to create a platform.
Troubleshooting
I've added a troubleshooting section to this chapter, as I'm 99.99% certain that the first time you run through this it won't work. If you're in the 0.01% of those where it did work first time congratulations - you're in the vast minority!
There are so many moving parts here it's exceedingly likely you'll miss a bit of config, or mistype something, so here's some things to look at.
- Ensure that the endpoints for your API are the correct ones being used to configure Auth0, the JavaScript client and the .NET API in the multiple places they require them (again you can source the truth in:
Properties/launchSettings.json). If I were a betting man, if you're getting issues this is probably where it'll stem from - Look at the error sources:
- Use Developer Tools in your browser and observe the errors there
- Obtain any errors that are passed back from Auth0 in the URL box of the browser
- Look at the .NET API log output to see if it's an issue there
- I've found AI tools to be useful in fault finding stuff like this, so prompt it accordingly (provide context) and they can be insightful. I've put an example prompt below that may be helpful.
I have a plain JavaScript client using the Auth0 SDK that I'm using to authenticate a user, and in turn call a .NET REST API endpoint that requires the bearer token provided by a successful Auth0 login. I'm currently getting the following error: <INSERT YOUR ERROR LOG HERE>
Again, if you've copied the code from here or GitHub the issue is almost certainly going to be with config. Check and double check.
If you're getting frustrated - walk away. Honestly, when you're in the depths of something, sometimes you cannot see the wood for the trees. So walk away and leave it a day. Most usually when you come back to it later - the error will be obvious.
Version Control
With the code complete, it's time to commit our code. A summary of those steps can be found below, for a more detailed overview refer to Chapter 5
- Save all files
git add .git commit -m "add OAuth authentication"git push(will fail - copy suggestion)git push --set-upstream origin chapter_19_oauth- Move to GitHub and complete the PR process through to merging
- Back at a command prompt:
git checkout main git pull
Conclusion
This chapter represented a significant step forward in securing our API by implementing OAuth 2.0 authentication with Auth0 as our identity provider. We've successfully integrated industry-standard authentication that provides a professional, secure user experience.
The journey took us through three distinct phases: configuring Auth0 to act as our identity provider, updating our .NET API to validate JWT Bearer tokens, and building a JavaScript client application that orchestrates the complete authentication flow. While the implementation involved many moving parts, the result is a robust authentication system that mirrors what you'd find in production SaaS applications.
A key achievement in this chapter was establishing dual authentication schemes in our API. The RegistrationsController now requires OAuth authentication (Bearer tokens), ensuring that only authenticated users can register API keys. Meanwhile, other endpoints can continue using API key authentication for system-to-system communication. This flexibility demonstrates how modern APIs can support multiple authentication strategies tailored to different use cases.
The client application we built, though relatively simple, showcases the complete OAuth sign-in flow: redirecting users to Auth0 for authentication, handling the callback, managing authentication state, and making authenticated API calls with JWT tokens. This pattern forms the foundation for more sophisticated client applications.
Looking back at our authentication journey from Chapter 18, we now have a comprehensive security model: API keys for service accounts and programmatic access, and OAuth for human users with interactive login flows. Together, these approaches provide the authentication foundation required for production APIs.