14. Validation
About this chapter
In this chapter we'll revisit our approach to validations on both the DTOs and Models and move away from using DataAnnotations, and instead:
- DTOs will now use Fluent Validation
- Models will use EF Core Fluent API
Learning outcomes
- Understand why we're moving to Fluent Validation for DTOs
- Understand why we're moving to EF Core Fluent API for Models
- Understand how to implement both Fluent Validation and EF Core Fluent API in a .NET REST API
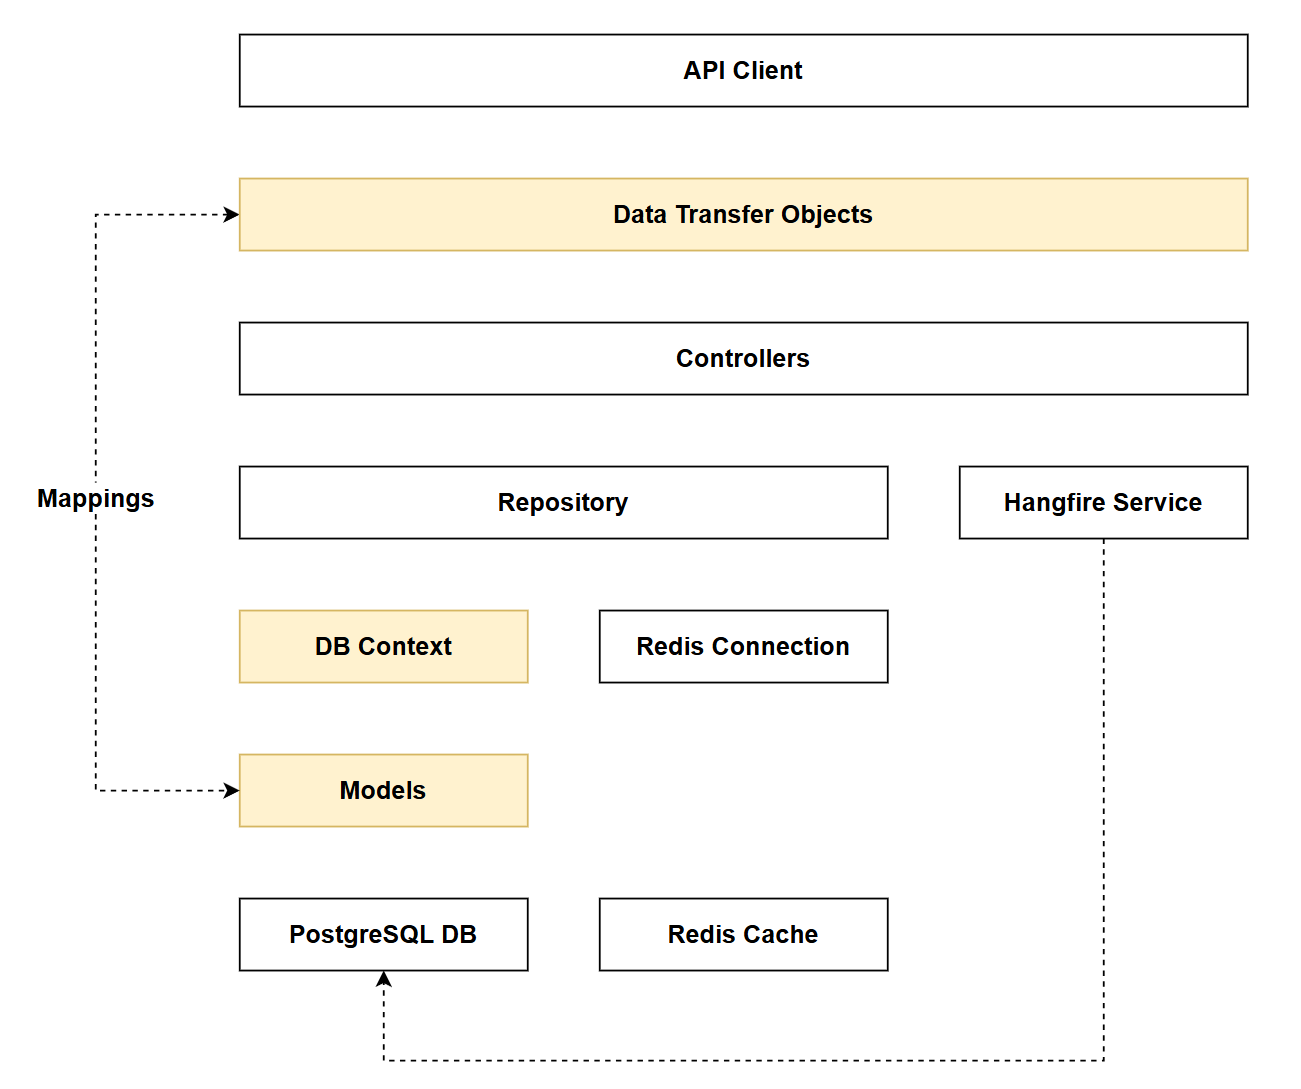
Architecture Checkpoint
In reference to our solution architecture, we'll be making code changes to the highlighted components in this chapter:
- DbContext (partially complete)
- Dtos (partially complete)
- Models (partially complete)
- The code for this section can be found here on GitHub
- The complete finished code can be found here on GitHub
Feature branch
Ensure that main is current, then create a feature branch called: chapter_14_validation, and check it out:
git branch chapter_14_validation
git checkout chapter_14_validation
If you can't remember the full workflow, refer back to Chapter 5
Validation Revisit (DTOs)
Let's take a look at how we're currently performing validation on one of our DTOs: CommandCreateDto:
using System.ComponentModel.DataAnnotations;

namespace CommandAPI.Dtos;

public record CommandCreateDto(
    [Required]
    [MaxLength(250)]
    string HowTo,

    [Required]
    string CommandLine,

    [Required]
    int PlatformId);
We are using DataAnnotations, and decorate each of the record properties with the validations we require. What's wrong with this approach? Absolutely nothing for simple DTOs and validations like this, indeed this approach has the following benefits:
- Built into .NET Framework, there no additional dependencies
- Simple and quick for basic validations
- Declarative syntax is easy to read at a glance
- Works with ASP.NET Core model binding
- Validation rules are visible directly on the properties
Indeed, if I wasn't writing a book on APIs (!) and the API domain was not going to grow further - I'd just use DataAnnotations as we have here. However, as I feel it's my duty to furnish you with more choices as a developer building enterprise grade APIs, we need to discuss where this approach falls down, and what alternatives we have.
So in terms of disadvantages of Data Annotations:
- Limited to attribute-based rules (less flexible)
- Difficult to implement complex, conditional validation logic
- Hard to unit test in isolation
- Validation logic is tightly coupled to the DTO
- Can't easily reuse validation logic across different DTOs
- Clutters the DTO with multiple attributes
Where can we go from here? Enter Fluent Validation.
Fluent Validation
Fluent Validation is a popular open-source .NET library that provides a strongly-typed, rule-based approach to validating objects. Instead of decorating your classes with validation attributes, you create separate validator classes that define validation rules.
The benefits of using this approach include, but are not limited to:
- Highly flexible and expressive for complex validation scenarios
- Separates validation logic from DTOs (better separation of concerns)
- Easy to unit test validators independently
- Supports conditional validation and custom rules elegantly
- Reusable validators and validation rules
- Better error message customization
In terms of downsides:
- You're introducing an external dependency
- More configuration and set up - additional cognitive load
- Separation of concerns can be touted as both an advantage and disadvantage depending on your viewpoint (in this case rules are not immediately visible on the DTO)
Data Annotations are great for simple, straightforward validation. Fluent Validation is preferable when you need complex business rules, testability and maintainability, or when you're writing a book on APIs.
That's enough of the theory, let's dive into refactoring the validations on our DTOs.
Implementing Fluent Validation
Package References
First, we'll add the necessary package references as follows:
dotnet add package FluentValidation
dotnet add package FluentValidation.AspNetCore
Remove Data Annotations
Next up, we'll remove all the existing DataAnnotations from the DTOs, remembering that we only have validation attributes on DTOs involved in the mutation of data. Or to put it another way, we don't use DataAnnotations on the read DTOs.
With the DataAnnotations removed, your mutate DTO's should look like this:
CommandCreateDto
namespace CommandAPI.Dtos;

public record CommandCreateDto(
    string HowTo,
    string CommandLine,
    int PlatformId);
CommandUpdateDto
namespace CommandAPI.Dtos;

public record CommandUpdateDto(
    string HowTo,
    string CommandLine);
PaginationParams
namespace CommandAPI.Dtos;

public record PaginationParams
{
    public int PageIndex { get; init; } = 1;
    public int PageSize { get; init; } = 10;
}
PlatformCreateDto
namespace CommandAPI.Dtos;

public record PlatformCreateDto(
    string PlatformName);
PlatformUpdateDto
namespace CommandAPI.Dtos;

public record PlatformUpdateDto(
    string PlatformName);
Create Validators
For each of the impacted DTOs we'll create a validator class. Before doing that, create a folder in the root of the project called Validators.
CommandCreateDtoValidator
Inside the Validators folder create a file called CommandCreateDtoValidator.cs and add the following code:
using FluentValidation;
using CommandAPI.Dtos;

namespace Run1API.Validators;

public class CommandCreateDtoValidator : AbstractValidator<CommandCreateDto>
{
    public CommandCreateDtoValidator()
    {
        RuleFor(x => x.HowTo)
            .NotEmpty()
            .WithMessage("HowTo is required")
            .MaximumLength(250)
            .WithMessage("HowTo must not exceed 250 characters");

        RuleFor(x => x.CommandLine)
            .NotEmpty()
            .WithMessage("CommandLine is required");

        RuleFor(x => x.PlatformId)
            .GreaterThan(0)
            .WithMessage("PlatformId must be greater than 0");
    }
}
This code:
- Creates a validator for
CommandCreateDtoby inheriting fromAbstractValidator<T>- We discuss this more below
- Validates
HowTois not empty and doesn't exceed 250 characters - Validates
CommandLineis not empty - Validates
PlatformIdis greater than 0 - Provides custom error messages for each validation rule
CommandUpdateDtoValidator
Inside the Validators folder create a file called CommandUpdateDtoValidator.cs and add the following code:
using FluentValidation;
using CommandAPI.Dtos;

namespace Run1API.Validators;

public class CommandUpdateDtoValidator : AbstractValidator<CommandUpdateDto>
{
    public CommandUpdateDtoValidator()
    {
        RuleFor(x => x.HowTo)
            .NotEmpty()
            .WithMessage("HowTo is required")
            .MaximumLength(250)
            .WithMessage("HowTo must not exceed 250 characters");

        RuleFor(x => x.CommandLine)
            .NotEmpty()
            .WithMessage("CommandLine is required");
    }
}
This code:
- Creates a validator for
CommandUpdateDto - Validates
HowTois not empty and doesn't exceed 250 characters - Validates
CommandLineis not empty - Provides custom error messages for each validation rule
PaginationParamsValidator
Inside the Validators folder create a file called PaginationParamsValidator.cs and add the following code:
using FluentValidation;
using CommandAPI.Dtos;

namespace Run1API.Validators;

public class PaginationParamsValidator : AbstractValidator<PaginationParams>
{
    public PaginationParamsValidator()
    {
        RuleFor(x => x.PageIndex)
            .GreaterThanOrEqualTo(1)
            .WithMessage("Page index must be at least 1");

        RuleFor(x => x.PageSize)
            .InclusiveBetween(1, 100)
            .WithMessage("Page size must be between {From} and {To}. You provided {PropertyValue}");
    }
}
This code:
- Creates a validator for
PaginationParams - Validates
PageIndexis at least 1 - Validates
PageSizeis between 1 and 100 (inclusive) - Uses placeholder tokens in error messages to display the expected range and provided value
PlatformCreateDtoValidator
Inside the Validators folder create a file called PlatformCreateDtoValidator.cs and add the following code:
using FluentValidation;
using CommandAPI.Dtos;

namespace Run1API.Validators;

public class PlatformCreateDtoValidator : AbstractValidator<PlatformCreateDto>
{
    public PlatformCreateDtoValidator()
    {
        RuleFor(x => x.PlatformName)
            .NotEmpty()
            .WithMessage("Platform name is required")
            .MinimumLength(2)
            .WithMessage("Platform name must be at least 2 characters long");
    }
}
This code:
- Creates a validator for
PlatformCreateDto - Validates
PlatformNameis not empty - Validates
PlatformNamehas a minimum length of 2 characters - Provides custom error messages for each validation rule
PlatformUpdateDtoValidator
Inside the Validators folder create a file called PlatformUpdateDtoValidator.cs and add the following code:
using FluentValidation;
using CommandAPI.Dtos;

namespace Run1API.Validators;

public class PlatformUpdateDtoValidator : AbstractValidator<PlatformUpdateDto>
{
    public PlatformUpdateDtoValidator()
    {
        RuleFor(x => x.PlatformName)
            .NotEmpty()
            .WithMessage("Platform name is required")
            .MinimumLength(2)
            .WithMessage("Platform name must be at least 2 characters long");
    }
}
This code:
- Creates a validator for
PlatformUpdateDto - Validates
PlatformNameis not empty - Validates
PlatformNamehas a minimum length of 2 characters - Provides custom error messages for each validation rule
AbstractValidator<T> is the base class provided by FluentValidation that serves as the foundation for creating custom validators. When you inherit from it (using the generic type parameter T), you gain access to methods like RuleFor() which allow you to define validation rules for properties of type T. The constructor is where you define all your validation logic using the fluent API. Once created, these validators need to be registered with ASP.NET Core's dependency injection container - we'll wire this up in Program.cs in the next section.
Wire up in Program.cs
Finally, we need to wire up Fluent Validation in Program.cs. First, add the following 2 using statements to the top of Program.cs:
using FluentValidation;
using FluentValidation.AspNetCore;
Then add the following (highlighted) lines to register the Fluent Validation with our services container:
//.
//.
// Existing code

builder.Services.AddOpenApi();

builder.Services.AddValidatorsFromAssemblyContaining<Program>();
builder.Services.AddFluentValidationAutoValidation();

var app = builder.Build();

// Existing code
//.
//.
This code:
AddValidatorsFromAssemblyContaining<Program>()- Scans the assembly containingProgram.csand automatically registers all classes that inherit fromAbstractValidator<T>with the dependency injection containerAddFluentValidationAutoValidation()- Hooks Fluent Validation into the ASP.NET Core model binding pipeline, so validation runs automatically when DTOs are received in controller actions and populatesModelStatewith any validation errors
As AddFluentValidationAutoValidation() automatically validates models when they're bound in controller actions, you can remove the !ModelState.IsValid checks we have peppered in our Controllers. I'm going to leave them there for now in case we want to log validation checks.
Exercise the requests
You can re-run the requests from both commands.http and platforms.http to ensure validation errors are generated (when appropriate). For example, if I attempt to create Command without supplying both a commandLine and howTo properties:
### Create a new command
POST {{baseUrl}}/api/commands
Content-Type: application/json

{
  "platformId": 1
}
I'll get the following validation errors:
HTTP/1.1 400 Bad Request
Connection: close
Content-Type: application/problem+json; charset=utf-8
Date: Fri, 13 Feb 2026 10:42:08 GMT
Server: Kestrel
Transfer-Encoding: chunked

{
  "type": "https://tools.ietf.org/html/rfc9110#section-15.5.1",
  "title": "One or more validation errors occurred.",
  "status": 400,
  "errors": {
    "HowTo": [
      "The HowTo field is required.",
      "HowTo is required"
    ],
    "CommandLine": [
      "The CommandLine field is required.",
      "CommandLine is required"
    ]
  },
  "traceId": "00-db12e1008005f37321ac01ee2e1c4a85-29cc073fe61e6d37-00"
}
Validation Revisit (Models)
Now let's turn our attention to our Models, which currently use DataAnnotations. See Command as an example below:
using System.ComponentModel.DataAnnotations;
using System.ComponentModel.DataAnnotations.Schema;

namespace CommandAPI.Models;

public class Command : ICreatedAtTrackable
{
    [Key]
    public int Id { get; set; }

    [Required]
    [MaxLength(250)]
    public required string HowTo { get; set; }

    [Required]
    public required string CommandLine {get; set;}

    [Required]
    public DateTime CreatedAt { get; set; }

    // Foreign key to Platform
    public int PlatformId { get; set; }

    // Navigation property to represent the platform of the command
    [ForeignKey("PlatformId")]
    public Platform? Platform { get; set; }
}
Are we going to use Fluent Validation here too? No we are not - here's why:
Fluent Validation vs EF Core Fluent API - Different Concerns:
While both use a "fluent" syntax, they serve completely different purposes:
- Fluent Validation is for validating business rules on incoming data (DTOs) at the application boundary - things like "email must be valid format" or "age must be between 18-100"
- EF Core Fluent API is for configuring how entities map to the database schema - things like column types, max lengths, keys, relationships, and constraints
Why not use Fluent Validation for Models?
Models represent your database schema, not input validation. By the time data reaches your models, it should already be validated via DTOs. Using Fluent Validation on models would be:
- Redundant (we've already validated at the DTO level)
- The wrong tool for the job (we need schema configuration, not business rule validation)
- Running validation at the wrong layer of the application
Why use EF Core Fluent API?
The EF Core Fluent API allows us to:
- Keep our model classes clean (similar benefit to using Fluent Validation for DTOs)
- Configure database constraints that will be enforced at the database level
- Define complex relationships and indexes
- Have precise control over how our C# models map to database tables
- Separate configuration concerns from the model definition itself
Let's implement this now using the EF Core Fluent API in our DbContext.
Implementing EF Core Fluent API
Remove Data Annotations
Similar to what we did with the DTOs, we'll remove the use of DataAnnotations from our models. The code for the impacted models (Platform and Command) is as follows:
Command
namespace CommandAPI.Models;

public class Command : ICreatedAtTrackable
{
    public int Id { get; set; }
    public required string HowTo { get; set; }
    public required string CommandLine {get; set;}
    public DateTime CreatedAt { get; set; }
    public int PlatformId { get; set; }
    public Platform? Platform { get; set; }
}
Platform
namespace CommandAPI.Models;

public class Platform : ICreatedAtTrackable
{
    public int Id { get; set; }
    public required string PlatformName { get; set; }
    public DateTime CreatedAt { get; set; }
    public ICollection<Command> Commands { get; set; } = new List<Command>();
}
Update AppDbContext
We make use of the EF Core Fluent API by adding the following (highlighted) code to the OnModelCreating method in the AppDbContext class:
protected override void OnModelCreating(ModelBuilder modelBuilder)
{
    // Platform configuration
    modelBuilder.Entity<Platform>(entity =>
    {
        entity.HasKey(p => p.Id);

        entity.Property(p => p.PlatformName)
            .IsRequired();

        entity.Property(p => p.CreatedAt)
            .IsRequired();
    });

    // Command configuration
    modelBuilder.Entity<Command>(entity =>
    {
        entity.HasKey(c => c.Id);

        entity.Property(c => c.HowTo)
            .IsRequired()
            .HasMaxLength(250);

        entity.Property(c => c.CommandLine)
            .IsRequired();

        entity.Property(c => c.PlatformId)
            .IsRequired();

        entity.Property(p => p.CreatedAt)
            .IsRequired();
    });

    // Configuring one-to-many relationship
    modelBuilder.Entity<Platform>()
        .HasMany(p => p.Commands)
        .WithOne(c => c.Platform)
        .HasForeignKey(c => c.PlatformId)
        .OnDelete(DeleteBehavior.Cascade);

    modelBuilder.Entity<Command>()
        .HasIndex(c => c.PlatformId)
        .HasDatabaseName("Index_Command_PlatformId");
}
This code:
- Platform Configuration - Uses
Entity<Platform>()to configure thePlatformentity:- Sets
Idas the primary key - Configures
PlatformNameas required with a maximum length of 100 characters - Configures
CreatedAtas required
- Sets
- Command Configuration - Uses
Entity<Command>()to configure theCommandentity:- Sets
Idas the primary key - Configures
HowToas required with a maximum length of 250 characters - Configures
CommandLineas required - Configures
PlatformIdas required - Configures
CreatedAtas required
- Sets
The constraints we have placed on our models using the EF Core Fluent API are identical to those that existed previously when we used DataAnnotations. Therefore, there is no need to run another set of migrations as the DB schema is already aligned.
If we had introduced additional validations, or changed existing ones, then you would need to create and run a new set of migrations to align the DB schema with what we defined via the EF Core Fluent API.
Exercising requests
While this change should not materially impact making requests to the API, it's always good practice to run up the API and test a few requests just to make sure we've not introduced any run-time errors.
Version Control
With the code complete, it's time to commit our code. A summary of those steps can be found below, for a more detailed overview refer to Chapter 5
- Save all files
git add .git commit -m "add filtering and sorting to all resource list endpoints"git push(will fail - copy suggestion)git push --set-upstream origin chapter_14_validation- Move to GitHub and complete the PR process through to merging
- Back at a command prompt:
git checkout main git pull
Conclusion
In this chapter we successfully refactored our validation approach, moving away from DataAnnotations to more robust, maintainable solutions:
For DTOs: We implemented Fluent Validation, which gives us:
- Separation of validation logic from DTOs
- Better testability and flexibility
- Custom error messages and complex validation rules
- Cleaner DTO definitions
For Models: We implemented EF Core Fluent API, which provides:
- Separation of database configuration from model classes
- Cleaner model definitions
- Precise control over schema mapping
- Database-level constraint enforcement
By using the right tool for each concern: Fluent Validation for business rule validation at the application boundary, and EF Core Fluent API for database schema configuration, we've improved the separation of concerns in our API architecture. While both approaches use a fluent syntax, they serve fundamentally different purposes and operate at different layers of the application.
This refactoring sets us up well for the next chapter, where we'll explore error handling and how to provide meaningful error responses to API consumers.