Iteration 1 - Base API Build
Iteration Goal
To have a fully working 1st cut API running on out local development machine.
What we’ll build
By the end of this iteration we will have:
- A .NET 8 controller-based REST API
- 5 Endpoints
- List All resources
- Get 1 resource
- Create a resource
- Update a resource (full update)
- Delete a resource
- Data will be persisted to PostgreSQL running in Docker
- All source code will be committed to Git
The high-level architecture of what we’re building is shown below:
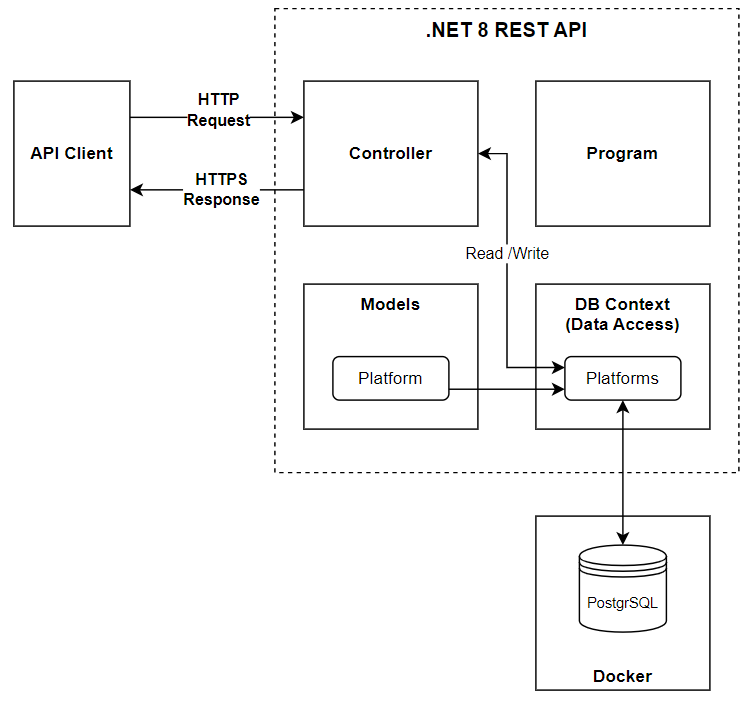
We have a lot to get through in this iteration. So buckle-up and let’s go!
Iteration Code
The code for this iteration can be found here.
Scaffold the project
At a command prompt navigate to your chosen working directory and type the following to scaffold up our project:
dotnet new webapi --use-controllers -n CommandAPI
This command:
- Uses the
webapitemplate to set up a bare-metal API - Specifies that we want to use controllers (MVC pattern)
- As opposed to the default Minimal API pattern
- Names the project
CommandAPI
At a command prompt change into the CommandAPI directory:
cd CommandAPI
Performing a directory listing (ls command) you should see the project artifacts we have:
Mode                 LastWriteTime         Length Name
----                 -------------         ------ ----
d----           7/09/2024  1:11 PM                Controllers
d----           7/09/2024  1:11 PM                obj
d----           7/09/2024  1:11 PM                Properties
-a---           7/09/2024  1:11 PM            127 appsettings.Development.json
-a---           7/09/2024  1:11 PM            151 appsettings.json
-a---           7/09/2024  1:11 PM            327 CommandAPI.csproj
-a---           7/09/2024  1:11 PM            133 CommandAPI.http
-a---           7/09/2024  1:11 PM            557 Program.cs
-a---           7/09/2024  1:11 PM            259 WeatherForecast.cs
Let’s run and test the API to make sure everything from a base set up perspective is working ok:
CommandAPI ~> dotnet run
Building...
info: Microsoft.Hosting.Lifetime[14]
      Now listening on: http://localhost:5279
info: Microsoft.Hosting.Lifetime[0]
      Application started. Press Ctrl+C to shut down.
info: Microsoft.Hosting.Lifetime[0]
      Hosting environment: Development
info: Microsoft.Hosting.Lifetime[0]
      Content root path: C:\Iteration_01\CommandAPI
Here you can see we have a single http endpoint running on port 5028.
It’s highly likely that you will have a different port allocation, don’t worry this is totally normal. When we scaffold the project, port allocations (as far as I can tell anyway) are somewhat random. Later we’ll be enabling https, at this point you can change the port allocation to match that of this tutorial, (this is completely optional however…)
To test that the API is working, we are going to use a tool called Insomnia to make calls to the API, (of course you can use whichever tool you prefer - Postman is a more popular alternative for example).
The steps on setting up Insomnia to make an API call are shown below:
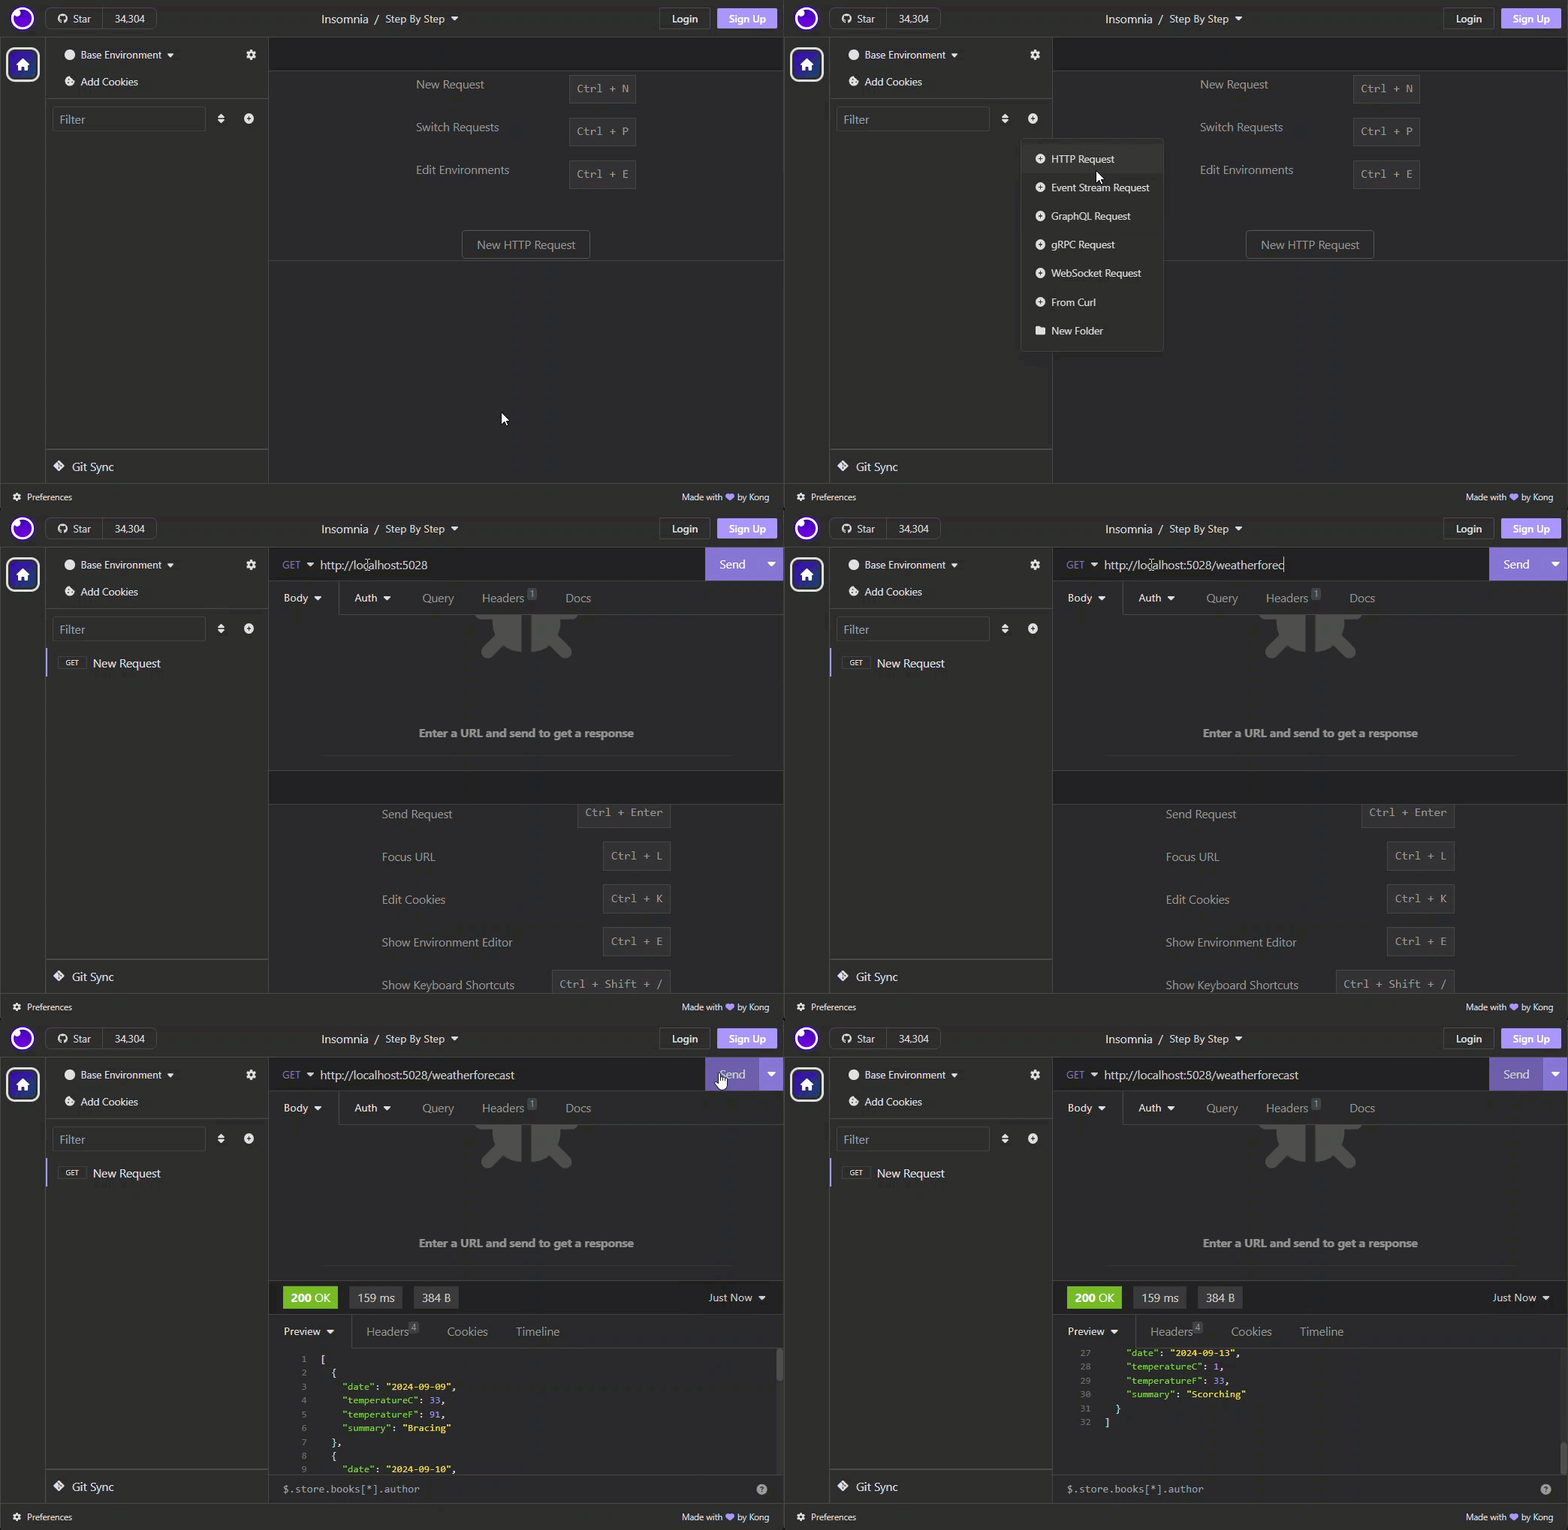
Here we:
- Create a
GETrequest - Paste in the API host address (
http://localhost:5279) - Add the
weatherforecastroute - Execute the API
This returns a JSON payload for us:
[
  {
    "date": "2024-09-09",
    "temperatureC": 33,
    "temperatureF": 91,
    "summary": "Bracing"
  },
  {
    "date": "2024-09-10",
    "temperatureC": 24,
    "temperatureF": 75,
    "summary": "Hot"
  },
  {
    "date": "2024-09-11",
    "temperatureC": 16,
    "temperatureF": 60,
    "summary": "Bracing"
  }
]
The
weatherforecastroute can be found by looking in theControllersdirectory and selecting theWeatherForecastController.csfile, here you will find 1 “action” calledGet, this is the action (or endpoint) we just called.
We’ll go into this in a lot more detail below.
Now that we’re confident that everything is working as it should, it’s time to delete stuff!
Remove boilerplate code
The API in its current form is not (for the most part) what we want to build, so we’re going to delete (and edit) some of the existing code.
- Delete the
WeatherForecastController.csfile containing our controller (leave thecontrollersfolder). - Delete the
WeatherForecast.csfile in the root of the project (this contains a class calledWeatherForecastthat was essentially the data returned in our test call). - Edit the
Program.csfile to contain only the following lines of code:
var builder = WebApplication.CreateBuilder(args);

builder.Services.AddControllers();

var app = builder.Build();

app.UseHttpsRedirection();

app.MapControllers();

app.Run();
Here we removed:
- References to Swagger. This is a really useful way to document REST API’s but it’s not part of our base build so we’ll remove it, (for now).
- Authorization middleware. We’ll need this later, but again for focus and clarity we’ll remove it in this iteration.
- Edit the
launchSettings.jsonfile (found in thePropertiesfolder) to resemble the following:
{
  "$schema": "http://json.schemastore.org/launchsettings.json",
  "profiles": {
    "https": {
      "commandName": "Project",
      "dotnetRunMessages": true,
      "launchBrowser": true,
      "launchUrl": "swagger",
      "applicationUrl": "https://localhost:7086;http://localhost:5279",
      "environmentVariables": {
        "ASPNETCORE_ENVIRONMENT": "Development"
      }
    }
  }
}
Here we removed:
- IIS Settings: We’re not running our API from IIS so we don’t need this.
- Redundant profiles. We’re only going to use the
httpsprofile.
In the remaining profile you can see that we now have 2 applicationUrls:
http://localhost:5279https://localhost:7086(new)
We’ve now introduced a HTTPS address that we’ll use for the remainder of the book. While it can add some degree of added complexity (see below), I always default to https where possible, and would only consider http endpoints if there was a compelling reason to do so.
Points to note about https
HttpsRedirection
Looking back at the Program.cs file, you’ll see that one of the lines we retained was:
app.UseHttpsRedirection();
This is middleware that will take any request to a http address and redirect it to a https one. While we can’t test this right now (we’ve deleted our controller!), if you look at the log output for the API, you’ll notice the following warning:
warn: Microsoft.AspNetCore.HttpsPolicy.HttpsRedirectionMiddleware[3]
      Failed to determine the https port for redirect.
This occurred because the redirect attempt failed as we were using the http profile originally, and therefore there was no https route to go to.
Local Development Certificates
As we are using HTTPS, we need to employ a Self Signed Development Certificate to allow for HTTPS to work as expected. If this is the first time you’ve set up a .NET API you’ll more than likely need to explicitly trust a local self-signed certificate.
You can do that by executing the following command:
dotnet dev-certs https --trust
You will see output similar to the following, and as suggested you will get a separate confirmation pop up if this is indeed the first time you’ve done this:
Trusting the HTTPS development certificate was requested.
A confirmation prompt will be displayed if the certificate
was not previously trusted. Click yes on the prompt to trust the certificate.
Successfully trusted the existing HTTPS certificate.
Add Packages
We now want to add the packages to our project that will support the added functionality we require.
The package repository for .NET is called NuGet, when we add package references to our project file, they are downloaded from here.
To add the packages we need execute the following:
dotnet add package Npgsql.EntityFrameworkCore.PostgreSQL
dotnet add package Microsoft.EntityFrameworkCore.Design
These packages allow us to use the PostgreSQL database from a .NET app.
To double check the references were added successfully, I like to look in the .csproj file, in our case: CommandAPI.csproj. You should see something similar to the following:
<Project Sdk="Microsoft.NET.Sdk.Web">

  <PropertyGroup>
    <TargetFramework>net8.0</TargetFramework>
    <Nullable>enable</Nullable>
    <ImplicitUsings>enable</ImplicitUsings>
  </PropertyGroup>

  <ItemGroup>
    <PackageReference Include="Microsoft.EntityFrameworkCore.Design" Version="8.0.8">
      <IncludeAssets>runtime; build; native; contentfiles; analyzers; buildtransitive</IncludeAssets>
      <PrivateAssets>all</PrivateAssets>
    </PackageReference>
    <PackageReference Include="Npgsql.EntityFrameworkCore.PostgreSQL" Version="8.0.4" />
    <PackageReference Include="Swashbuckle.AspNetCore" Version="6.4.0" />
  </ItemGroup>

</Project>
Here you should see the relevant package references in the <ItemGroup> section.
You’ll not a package reference to
Swashbuckle.AspNetCore, this was present in our boilerplate code and can also be removed for now.
Initialize Git
We will be using Git throughout the book to put our project under source control, and later we’ll be leveraging Git & GitHub to auto deploy our code to Azure. For now, we’ll just set up and use Git locally.
📖 Read more about source control here.
Create a .gitignore file
First off we’ll create a .gitignore file, this tells Git to exclude files and folders from source control, such as the obj and bin folders found in a .NET Project.
Why exclude?
We only want to put the code we write under source control, we are not interested in tracking changes to anything outside our control, or that can be built from source code, simply because it serves no useful purpose and can be quite inefficient.At a command prompt “inside” our project folder type the following command:
dotnet new gitignore
NOTE: That we don’t include the period in front of the
gitignoreargument even though the file its self is called.gitignore
Upon executing that command you should see that a .gitignore file has been created in our project that excludes the artifacts relevant to a .NET project. A brief sample is shown below:
# Build results
[Dd]ebug/
[Dd]ebugPublic/
[Rr]elease/
[Rr]eleases/
x64/
x86/
[Ww][Ii][Nn]32/
[Aa][Rr][Mm]/
[Aa][Rr][Mm]64/
bld/
[Bb]in/
[Oo]bj/
[Ll]og/
[Ll]ogs/
Basic Git Config
If this is the first time Git is being used on the PC or Mac that you’re working on, you’ll need to provide it with some basic identification details. This is so Git can track who has made changes to the code under source control. If we didn’t have this information, it would undermine the whole point of source control.
Git won’t let you make commits to a repository unless you have provided this information.
You only need to add your name and email address, to do some at a command prompt type:
git config --global user.name "Your Name"
git config --global user.email "your.email@example.com"
This will configure these details globally for all repositories on this machine.
Initialize Git
We’ve still not yet put our project under source control, to do so, type the following at a command prompt inside the project folder:
git init
git add .
git commit -m "chore: initial commit"
These commands do the following:
- Initialize a git repository
- Stage all our files for commit (using the “.” wildcard)
- Finally commit all our staged files along with a Conventional Commit message
📖 You can read more about Conventional Commits here.
We should also check to see what our initial branch is called. Later versions of Git will name this branch main while older versions will name it master. Given the negative connotations of the latter, it’s standard practice today to rename to main.
To check the name of this branch type:
git branch
This will return something like:
* main
If this is the case - all good! If you’re using an earlier version of Git and this is not what you get, then I’d suggest 2 things:
- You update the version of Git you’re using
- Rename the branch to
mainby typing the following:
git branch -m main
Create a feature branch
For the rest of the code in this section, we’re going to place that into a feature branch, meaning:
- We move off of the
mainbranch - Make and test our changes on a separate feature branch (so as not to pollute the main branch until we’re happy the code is good)
- When we’re happy we’ll merge the feature branch back to main.
To create a feature branch, type the following:
git branch iteration_01
gir checkout iteration_01
The first command creates the new branch, the 2nd moves us on to it. If you now type:
git branch
You should see something similar to the following:
* iteration_01
  main
We have 2 branches with the active one being iteration_o1.
Models and Data
So this is really where the build proper begins, and we start to write some c# code!
We’ll start with creating our first model: Platforms.
What are platforms?
This model will provide API consumers with access to the Platforms resource, with platforms referring to various applications that we can have command line prompts for. In this first instance we’re going to keep this model super simple, and extend it in later iterations when we come on a looking at multi-resource APIs.Create Platform Class
- In the root of our project, create a new folder called
Models - Inside this folder create a file called
Platform.cs - Place the following code into
Platform.cs:
using System.ComponentModel.DataAnnotations;

namespace CommandAPI.Models;

public class Platform
{
    [Key]
    public int Id { get; set; }

    [Required]
    public required string PlatformName { get; set; }
}
This code creates a class called Platform that has 2 properties:
Idwhich is an integer and represents the primary key value of our resourcePlatformNamewhich is a string representing the name of our platform
You can see that both properties are decorated with annotations that further specify the requirements of our properties. We’ll talk more about this when we come representing this class down to our database.
Decorating the
Idproperty with[Key]is probably somewhat redundant, as this is the default behavior of anIdproperty when it’s migrated down to our database. I just like to include it for readability purposes
Create a Database Context
A Database Context represents our physical database (in this case PostgreSQL) in code, it is essentially the intermediary between our code and the physical database.
- In the root of our project, create a new folder called
Data - Inside this folder create a file called
AppDbContext.cs - Place the following code into
AppDbContext.cs:
using CommandAPI.Models;
using Microsoft.EntityFrameworkCore;

namespace CommandAPI.Data;

public class AppDbContext : DbContext
{
    public AppDbContext(DbContextOptions<AppDbContext> options) : base(options)
    {

    }

    public DbSet<Platform> platforms { get; set; }
}
This code:
- Creates a custom database context called
AppDbContext - This custom class inherits from a base class provided by Entity Framework Core
- The class constructor accepts
DbContextOptions<AppDbContext> optionswhich allows us to configure the context with things like a connection string to our database : base(options)calls the constructor of the base class (DbContext) and passes the options parameter to it.- Our
Platformclass is represented as aDbSetwhich essentially models that entity in our database as a table calledPlatforms. Note that our classPlatformis singular (representing 1 platform), while ourDdSetis plural as it represents multiple platforms.
Docker
In the last few sections we have been writing code to model our data (the Platform class), and talk to our database (the AppDbContext class). All well and good, but where is our database?
Great question - and we answer it in this section.
We are going to use Docker (specifically Docker Desktop & Docker Compose) to quickly spin up an instance of PostgreSQL.
I’m just going to use the term Docker from now on to refer to Docker Desktop.
Check Docker is installed
If you’ve followed the steps in Iteration 0 you should have checked this off already but in case you skipped that, run the following command to make sure that Docker is installed:
docker --version
This should (no surprises) return the version of Docker (Desktop) you have installed. If you get anything other than this, then you may need to check your installation.
Check Docker is running
Just because Docker is installed does not mean to say you have it running, to check this type:
docker ps
This attempts to display any running containers, it doesn’t matter if we do or don’t, the point is that the command should return something meaningful, an error response as shown below means you need to start your instance of Docker:
error during connect: Get "http://...": open //./pipe/dockerDesktopLinuxEngine:
The system cannot find the file specified.
Running the command after Docker starts should give you the following (it may look a little different if you have containers running):
CONTAINER ID IMAGE COMMAND CREATED STATUS PORTS NAMES
Create Docker Compose File
Docker Compose is a way to spin up containers, (multiple containers even) by detailing their specification in a docker-compose.yaml file, and that’s just what we’re going to do next.
In the root of your project, create a file called: docker-compose.yaml, and populate it with the following code:
services:
  postgres:
    image: postgres:latest
    container_name: postgres_db
    ports:
      - "5432:5432"
    environment:
      POSTGRES_DB: commands
      POSTGRES_USER: cmddbuser
      POSTGRES_PASSWORD: pa55w0rd
    volumes:
      - postgres_data:/var/lib/postgresql/data

volumes:
  postgres_data:
    driver: local
Here’s a brief explanation of what this file is doing:
- We create a
servicecalledpostgres, which contains the remaining config that will define our PostgreSQL database running as a Docker container imagetells us the image or blueprint we want to use for out service - this is retrieved from Docker Hub by default.container_nameassigns the namepostgres_dbto the container. It makes it easier to refer to.portsmaps the container’s PostgreSQL port (5432) to the host machine’s port (5432). This allows you to access PostgreSQL from your local machine or other containers.environmentallows us to define environment variables we use to configure our instance of PostgreSQL. The values are self-explanatory.volumes(insideservices) This mounts a Docker volume namedpostgres_datato the PostgreSQL data directory (/var/lib/postgresql/data). This ensures that the database’s data persists even if the container is stopped or removedvolumes(top level) specifies the driver for our volume
Running Docker Compose
To run up our container, (ensuring that you are “in” the directory that contains the docker-compose.yaml file) type the following:
docker compose up -d
This will spin up a Docker container running PostgreSQL
The first time...
The first time you run this command Docker will have to retrieve the image (in this casepostgres:latest) from Docker Hub. This may take some time depending on the image size and the speed of your connection. Once the image has been downloaded, then next time you run docker compose up the container will spin up quickly, (unless there is a newer image in which case this will be retrieved…)
Assuming this was successful you should see a running container when you run: docker ps as shown below:
CONTAINER ID   IMAGE             COMMAND                  CREATED      STATUS         PORTS                    NAMES
d85f0cc62469   postgres:latest   "docker-entrypoint.s…"   6 days ago   Up 6 minutes   0.0.0.0:5432->5432/tcp   postgres_db
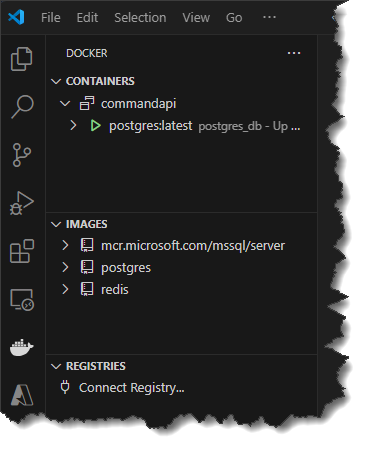
If you have installed the Docker extension for VS Code you can also see your containers and images here:
Testing our DB connection
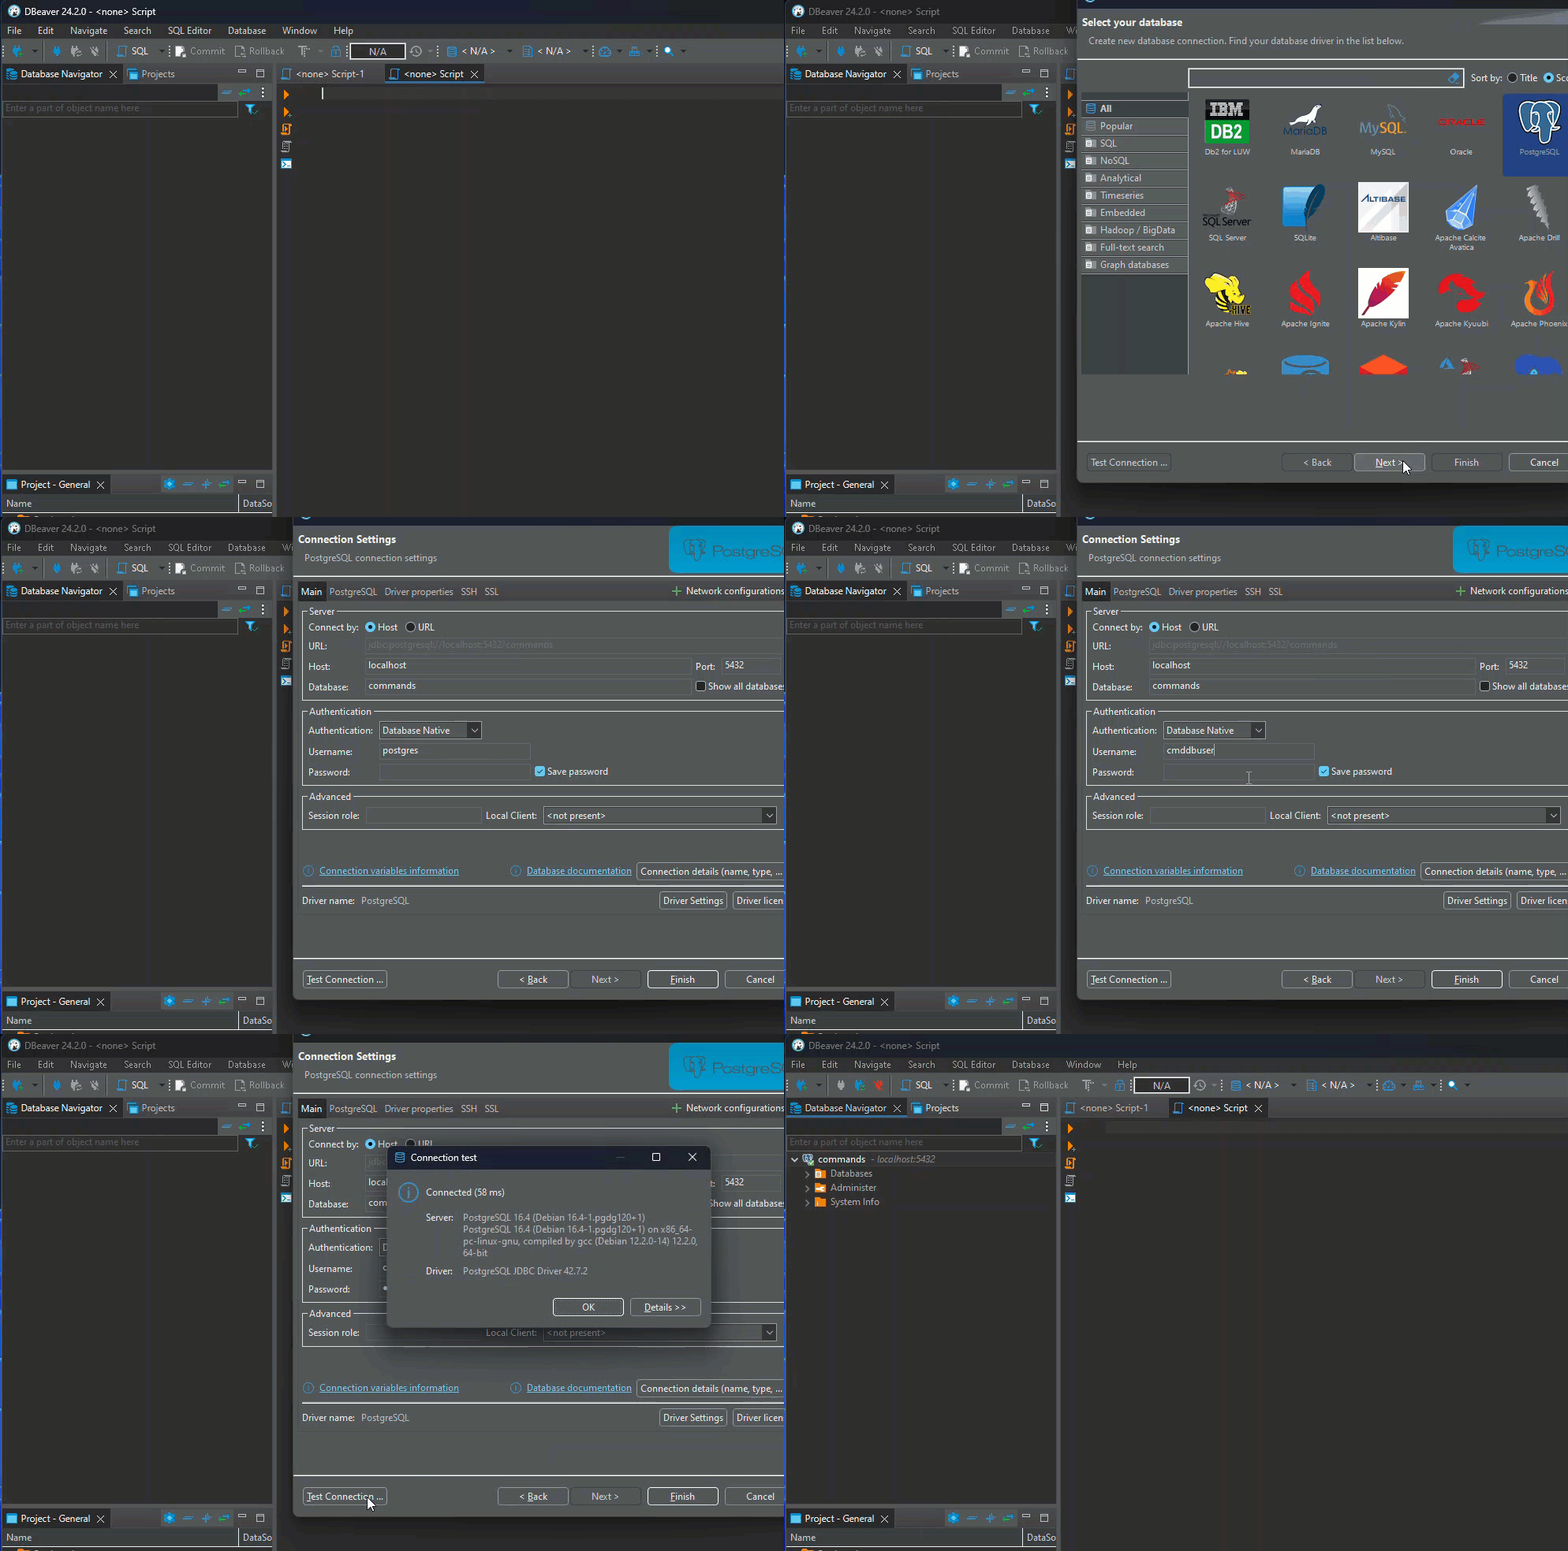
While having a running container is a great sign, I always like to double-check the config by connecting into the database using a tool like DBeaver, the brief video below shows you how to do this:
.NET Configuration
Before we can connect to out running PostgrSQL instance from our API, we need to configure a connection string. We could hard code this, but that’s a terrible idea for a number of reasons, including but not limited to:
- Security: you should never embed sensitive credentials in code in case they leak to individuals who should not have access to them.
- Configuration: If you hard code values, and you need to change these values it would mean that you would have to: alter the code, test the code & deploy the code. Way too much for config.
We will therefore leverage the .NET Configuration Layer to allow us to configure our connection string.
Let’s take a look at what a valid connection string would look like for our PostgreSQL instance:
Host=localhost;Port=5432;Database=commands;Username=cmddbuser;Password=pa55w0rd;Pooling=true;
Here you can see that we are configuring:
Host- the hostname of our db instancePort- The port we can access the db server onDatabase- the database that will store our tablesUsername- The user account name we have configured that has access to the DBPassword- The users passwordPooling- Defines whether we want to use connection pooling
For the purposes of this tutorial we’re going to categorize these items as either:
- Sensitive / secret
- Non-sensitive / public
These assignments can be seen below:
| Config Element | Security Classification |
|---|---|
| Host | Non-sensitive |
| Port | Non-sensitive |
| Database | Non-sensitive |
| Username | Sensitive |
| Password | Sensitive |
| Pooling | Non-sensitive |
Isn't it all sensitive?
The security conscious of you will most probably state that all that info could be considered sensitive - and you’re most probably correct. In the wrong hands the majority of this information could be of use to someone with less than pure intentions.
For the purposes of the book however, I want to demonstrate the use of separate .NET configuration sources, so I have classed the data in this way.
appsettings
For our non-sensitive data we are going to use the appsettings.Development.json file, so into that file place the following:
{
  "Logging": {
    "LogLevel": {
      "Default": "Information",
      "Microsoft.AspNetCore": "Warning"
    }
  },
  "ConnectionStrings": {
    "PostgreSqlConnection":"Host=localhost;Port=5432;Database=commands;Pooling=true;"
  }
}
Here you can see that we’ve added a Json object called ConnectionStrings, that contains a connection string for our PostgreSQL database, well the non-sensitive parts anyway.
You’ll also note that we updated appsettings.Development.json and not appsettings.json, this is because we only want this configuration to apply to our application when it is running in a Development environment.
You can read more about development environments here.
User Secrets
For the sensitive parts of our connection string, we are going to store those as user-secrets.
User secrets are stored on the current users local file system in a json file called screts.json. You would usually have a separate secrets.json file for each of your projects. Because the file is stored in a file system location accessible only to the logged in user - they are considered secret enough for development environment purposes.
The other advantage of the secrets.json file is that it does not form part for the code-project so it is not put under source control, (you don’t even need to add it to .gitignore).
To use user-secrets you need to configure your projects .csproj file with a unique value contained between <UserSecretsId> XML tags. Thankfully there is a command line prompt to do this for us.
NOTE: If you have cloned the source code from GitHub and take a look in the
.csprojfile you’ll note this is already there.
To initialize user secrets type:
dotnet user-secrets init
This will add the necessary entry for you. You can change the GUID to whatever you like, but as the GUID ends up being the name of a folder on your file system, it needs to be unique within that file location.
NOTE: the folder is not created until you create your first secret.
We’re now going to create 2 secrets: 1 for our DB user name, and 1 for the password, we do that as follows:
dotnet user-secrets set "DbUserId" "cmddbuser"
dotnet user-secrets set "DbPassword" "pa55w0rd"
Multiple config sources
We’ve configured 2 configuration sources: appsettings.Development.json and secrets.json. They both get consumed by the .NET configuration layer and presented “as one”.
If you’ve not done so already, it may be worth referring to the .NET Configuration theory section as this is discusses (amongst other things) the order of precedence of the various configurstion sources you can have.
Update Program.cs
We’ve now created everything we need for our data layer, with one exception: we need to instantiate an instance of our DB Context and supply it with a valid connection string so that it can connect to PostgreSQL.
In this section we’ll first construct our connection string by reading in the config values we set up in the last section.
Second, we’ll register our DB Context with our services container so we can inject it into other parts of our app - this is called dependency injection.
The code for this is shown below:
// Required namespace references
using CommandAPI.Data;
using Microsoft.EntityFrameworkCore;
using Npgsql;

var builder = WebApplication.CreateBuilder(args);

// 1. Build Connection String
var pgsqlConnection = new NpgsqlConnectionStringBuilder();
pgsqlConnection.ConnectionString = builder.Configuration.GetConnectionString("PostgreSqlConnection");
pgsqlConnection.Username = builder.Configuration["DbUserId"];
pgsqlConnection.Password = builder.Configuration["DbPassword"];

// 2. Register DB Context in Services container
builder.Services.AddDbContext<AppDbContext>(opt => opt.UseNpgsql(pgsqlConnection.ConnectionString));

builder.Services.AddControllers();

// .
// .
// Same code as before, omitted for clarity
🔎 View the complete code on GitHub
Here you can see that we read in the following configuration elements via the .NET configuration layer:
PostgreSqlConnection- (fromappsettings.Development.json)DbUserId- (fromsecrets.json)DbPassword- (fromsecrets.json)
Then finally we register our DB Context in our services container and configure it with the connection string we’ve created.
Migrations
The last thing we need to do in our data layer is migrate the Platform model down to the PostgreSQL DB. At the moment we only have a database server configured, but no database, and no tables representing our data (in this case platforms).
We do this using Entity Framework Core (EF Core), which is an Object Relational Mapper (ORM). ORM’s provide developers with a framework that allows them to abstract themselves away from using database native features (like SQL) and manipulate data entities through their chosen programming language (in our case C#).
NOTE: EF Core does allow you to execute SQL too, just in case there are features that it does not support (bulk delete is the one that springs to mind).
To migrate our Platform class down to our DB, we need to do 3 things:
- Install the EF Core command line tool set
- Generate our migrations
- Run our migrations
1. Install EF Core tools
To install EF Core tools type:
dotnet tool install --global dotnet-ef
Once installed, you may need to update them from time to time, to do that, type:
dotnet tool update --global dotnet-ef
Generate migrations
Again at a command prompt, make sure you are “in” the project foleder and type:
dotnet ef migrations add InitialMigration
This will generate a Migrations folder in the root of your project, with 3 files. Looking at the file called <time_stamp>_InitialMigration.cs we can see that we have:
- An
Upmethod - this defines what will be created in our database - A
Downmethod - this defines what needs to happen to rollback what was created by this migration
Over time you will end up with multiple migrations, each of which will need to be run (in sequence) to construct your full data-schema. This is what’s called a Code First approach to creating your database schema, as opposed to Database First, in which you create artifacts directly in your database (tables, indexes etc.) and “import” them into your code project.
At this point we still don’t have anything on our database server…
Run migrations
The last step (and the one where we find out if we’ve made any mistakes) is to run our migrations. This will test out:
- Whether we have configured out DB Server correctly
- Whether we have set up configuration correctly
- Whether we have coded the DB Context and Platform model correctly
To run migrations, type:
dotnet ef database update
EF Core will generate output related to the creation of database artifacts and will end with Done.
🎉 This is a bit of a celebration checkpoint, if you managed to get all this working - you’ve done really well!
💡 Try for yourself: Use DBeaver to take a look and see what was created in the server
Not working?
There are a lot of things that could have gone wrong here - so don’t worry! It’s totally normal for you to get this when coding. Indeed, making mistakes and correcting them is absolutely the best way to learn.
If you have got to this point, and your migrations have failed, here’s some things to try:
- Ensure Docker is running, as is your container (type
docker ps) to list running containers - Connect into the database using a tool like DBeaver
- Double check the configuration values, a simple way to check this would be to add the following line to
Program.cs:
app.MapControllers();

// Add the following line here
Console.WriteLine(pgsqlConnection.ConnectionString);

app.Run();
This will just print the value of the connection string to the console, if you’ve been following along exactly this should be:
Host=localhost;Port=5432;Database=commands;Pooling=True;Username=cmddbuser;Password=pa55w0rd
Check every aspect of the string - there is no forgiveness in coding!
Other than that, review the code on GitHub for any other mistakes.
Controller
Let’s take a quick look at what we’d achieved so far, and what we have left this iteration:
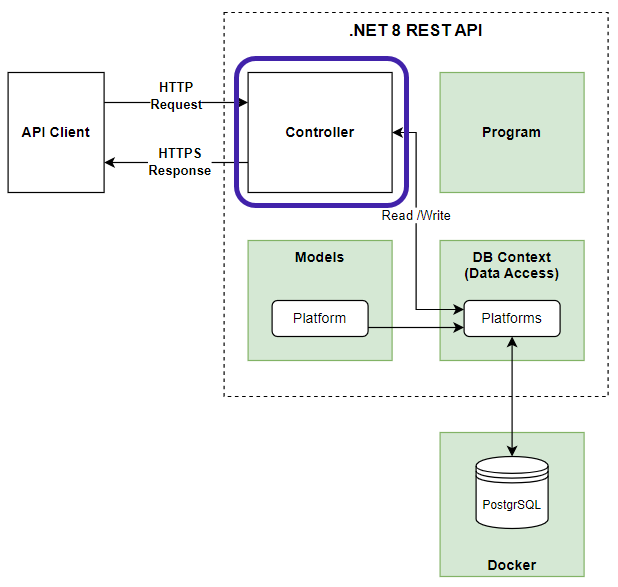
- Program.cs ✅
- Models ✅
- DB Context (Including configuration) ✅
- PostgreSQL Server ✅
- Database Migrations ✅
That just leaves us with our controller.
Controllers form part of the MVC pattern (Model View Controller), and act as an intermediary between the Model (data and business logic) and the View (user interface). It handles inputs, processes them, and updates both the model and the view accordingly.
In the case of an API we don’t really have a view / user interface in the classic sense, but you could argue the JSON payload returned by the controller acts as a type of view in this context.
Minimal APIs Vs Controller APIs
Microsoft introduced the Minimal API pattern with the release of .NET 6 as an alternative to controller-based APIs. Minimal APIs were designed to simplify the development of lightweight HTTP APIs by reducing the boilerplate code typically associated with ASP.NET Core applications.
There are pros and cons of each model, and as usual it really comes down to your use-case.
| Controllers | Minimal APIs | |
|---|---|---|
| Pros | - Well-structured - More features - Easier to test - Convention of configuration |
- Simpler to develop - Fewer files - Fast Development time - More flexible design |
| Cons | - More code (bloat) - More abstractions - Slightly less performant |
- Lack of structure - Fewer features - Harder to test |
I chose to go with a controller based approach for the feature support, and for the scalability advantages in larger application environments. The pattern is also prevalent in the .NET space so you’ll probably need to know it.
Finally, much like learning to drive a car with manual transmission, it’s easier to move from driving a car with manual transmission, to one with auto - and not the other way around. The intimation here is that I think it’s easier learn about controllers and move to minimal APIs, than vice-versa.
In future iterations (TBD) I’d like to provide a Minimal API build for the API presented in this book.
Create the controller
To create the controller, add a file with the following name to the Controllers folder: PlatformsController.cs - noting the deliberate pluralization of Platforms.
Into that file add the following code:
using CommandAPI.Data;
using CommandAPI.Models;
using Microsoft.AspNetCore.Mvc;
using Microsoft.EntityFrameworkCore;

namespace CommandAPI.Controllers;

[Route("api/[controller]")]
[ApiController]
public class PlatformsController : ControllerBase
{
  private readonly AppDbContext _context;

  public PlatformsController(AppDbContext context)
  {
    _context = context;
  }
}
- We define a class called
PlatformsController - This inherits from a base class called
ControllerBase- this provides us with some pre-configured conventions - The class is decorated with 2 attributes:
[Route("api/[controller]")]- This defines the default route for this controller, so actions in this controller can be accessed at:<hostname>/api/platforms[ApiController]- This provides us with a set of features beneficial to an API developer including but not limited to: Model State Validation, Automatic HTTP 400 responses & Binding Source Attributes.
- We define a class constructor and inject the
AppDbContextclass using constructor dependency injection - As part of the DB Context injection, we define a
private readonlyfield called_context, we’ll use this to access out DB Context from the controllers actions
At this point we really just a have “shell” of a constructor - for it to be of any use we need to add some actions. These are defined below:
| Name | Verb | Route | Returns |
|---|---|---|---|
| GetAllPlatforms | GET | /api/platforms | A list of all platforms |
| GetPlatformById | GET | /api/platforms/{platformId} | A single platform (by Id) |
| CreatePlatform | POST | /api/platforms | Creates a platform |
| UpdatePlatform | PUT | /api/platforms/{platformId} | Updates all attributes on a single platform |
| DeletePlatform | DELETE | /api/platforms/{platformId} | Deletes a single platform (by Id) |
Points of note
-
The Verb and the Route taken in combination make the action unique, e.g.:
- GetAllPlatforms & CreatePlatform have the same route, but respond to different verbs
-
Verbs in REST APIs are important. Typically they map to the following:
GET= ReadPOST= CreatePUT= Update everythingPATCH(Not used yet) = Update specified propertiesDELETE= Delete
-
Actions will always response with a HTTP status code indicating the success or failure of the request:
- 1xx: Informational - The server has received the request and is processing it but the client should wait for a response
- 2xx: Success - The request was successfully received and processed, common codes are:
- 200 OK: Usually in response to
GEToperations - 201 Created: Usually in response to
POSToperations - 204 No Content: Usually in response to
PUT,PATCHandDELETEoperations
- 200 OK: Usually in response to
- 3xx: Redirection - Further action is needed from the client to complete the request. This usually involves redirecting to a different URL.
- 4xx: Client Errors - The client requestor has made an invalid request - the client has to resolve the issue.
- 5xx: Server Errors - The server encountered an error or is incapable of handling the request - the issue needs to be resolved by the server (in our case the API provider).
GetAllPlatforms Action
To create our first action just after our class constructor, add the following code:
The completed controller code for this iteration can be found here.
[Route("api/[controller]")]
[ApiController]
public class PlatformsController : ControllerBase
{
  private readonly AppDbContext _context;

  public PlatformsController(AppDbContext context)
  {
    _context = context;
  }

  //------ GetAllPlatforms Action -----
  [HttpGet]
  public async Task<ActionResult<IEnumerable<Platform>>> GetAllPlatforms()
  {
    var platforms = await _context.platforms.ToListAsync();

    return Ok(platforms);
  }
}
Here we define an GET API endpoint that asynchronously retrieves and returns a list of platforms.
Explanation in detail:
- The method is decorated with the
[HttpGet]attribute, meaning that it responses toGETrequests - The method is defined as
asyncindicating that the method will run asynchronouslyasyncmethods typically return aTaskwhich is a placeholder to the final return type which in this case is a collection ofPlatformmodels
- ActionResult is used to encapsulate the HTTP response, allowing the return different types of HTTP responses (e.g., 200 OK, 404 Not Found, etc.).
- Inside our method we use our Db Context (
_context) to access a list ofPlatforms- We use the async variant of
ToList...as our method has been defined as asynchronous - When we call the
ToListAsync()method, we need to call it withawait
- We use the async variant of
- Finally we return our list (if any) using the
OKmethod - this issues a HTTP 200 response.
Quick Test
Ensure you’ve saved everything, and run up our API (making sure Docker and our PostgreSQL container are running to):
dotnet run
Then using the tool of your choice, make a call to this endpoint:
https://localhost:7086/api/platforms
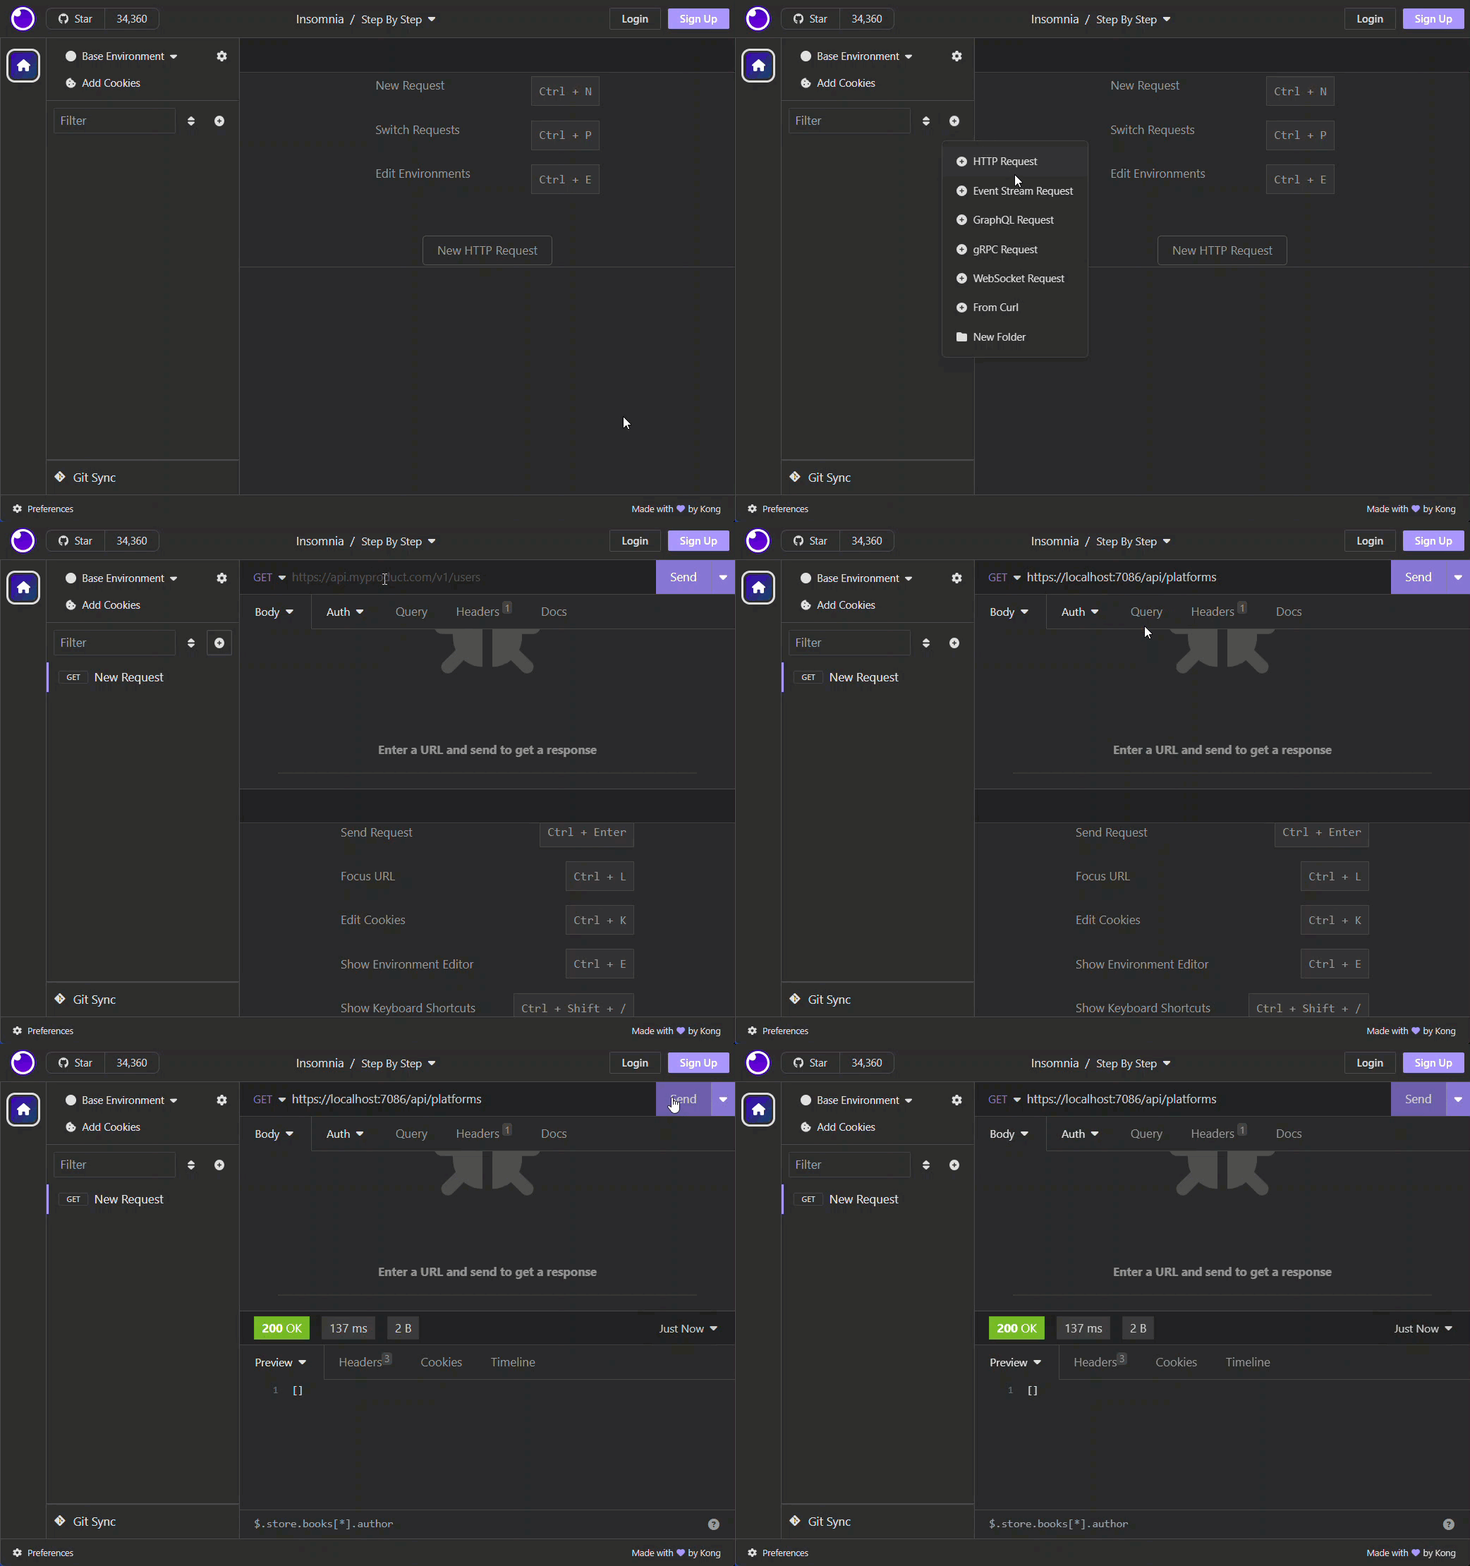
You should get a HTTP 200 result, but an empty list of platforms - which makes sense as we’ve not created any!
GetPlatformById Action
The next endpoint we’ll define is GetPlatformById, to do so add the following code after GetAllPlatforms (it can go anywhere inside the class, but I just like to order it in this way).
[HttpGet("{id}", Name = "GetPlatformById")]
public async Task<ActionResult<Platform>> GetPlatformById(int id)
{
  var platform = await _context.platforms.FirstOrDefaultAsync(p => p.Id == id);
  if(platform == null)
    return NotFound();

  return Ok(platform);
}
Explanation in detail:
- The method is decorated with:
[HttpGet("{id}", Name = "GetPlatformById")]- The method will respond to
GETrequests - We expect an
idto be passed in with the request - We explicitly name it:
GetPlatformById
- The method will respond to
- The method is
asyncreturning a singlePlatform(if any) - The method expects an integer (
int) attribute calledidthis is mapped through from theidvalue expected with the request - We use the
_contextto get theFirstOrDefaultplatform based on theid - If there is no match, then we return a HTTP 404 (Not Found) result
- If there is a match we return the platform
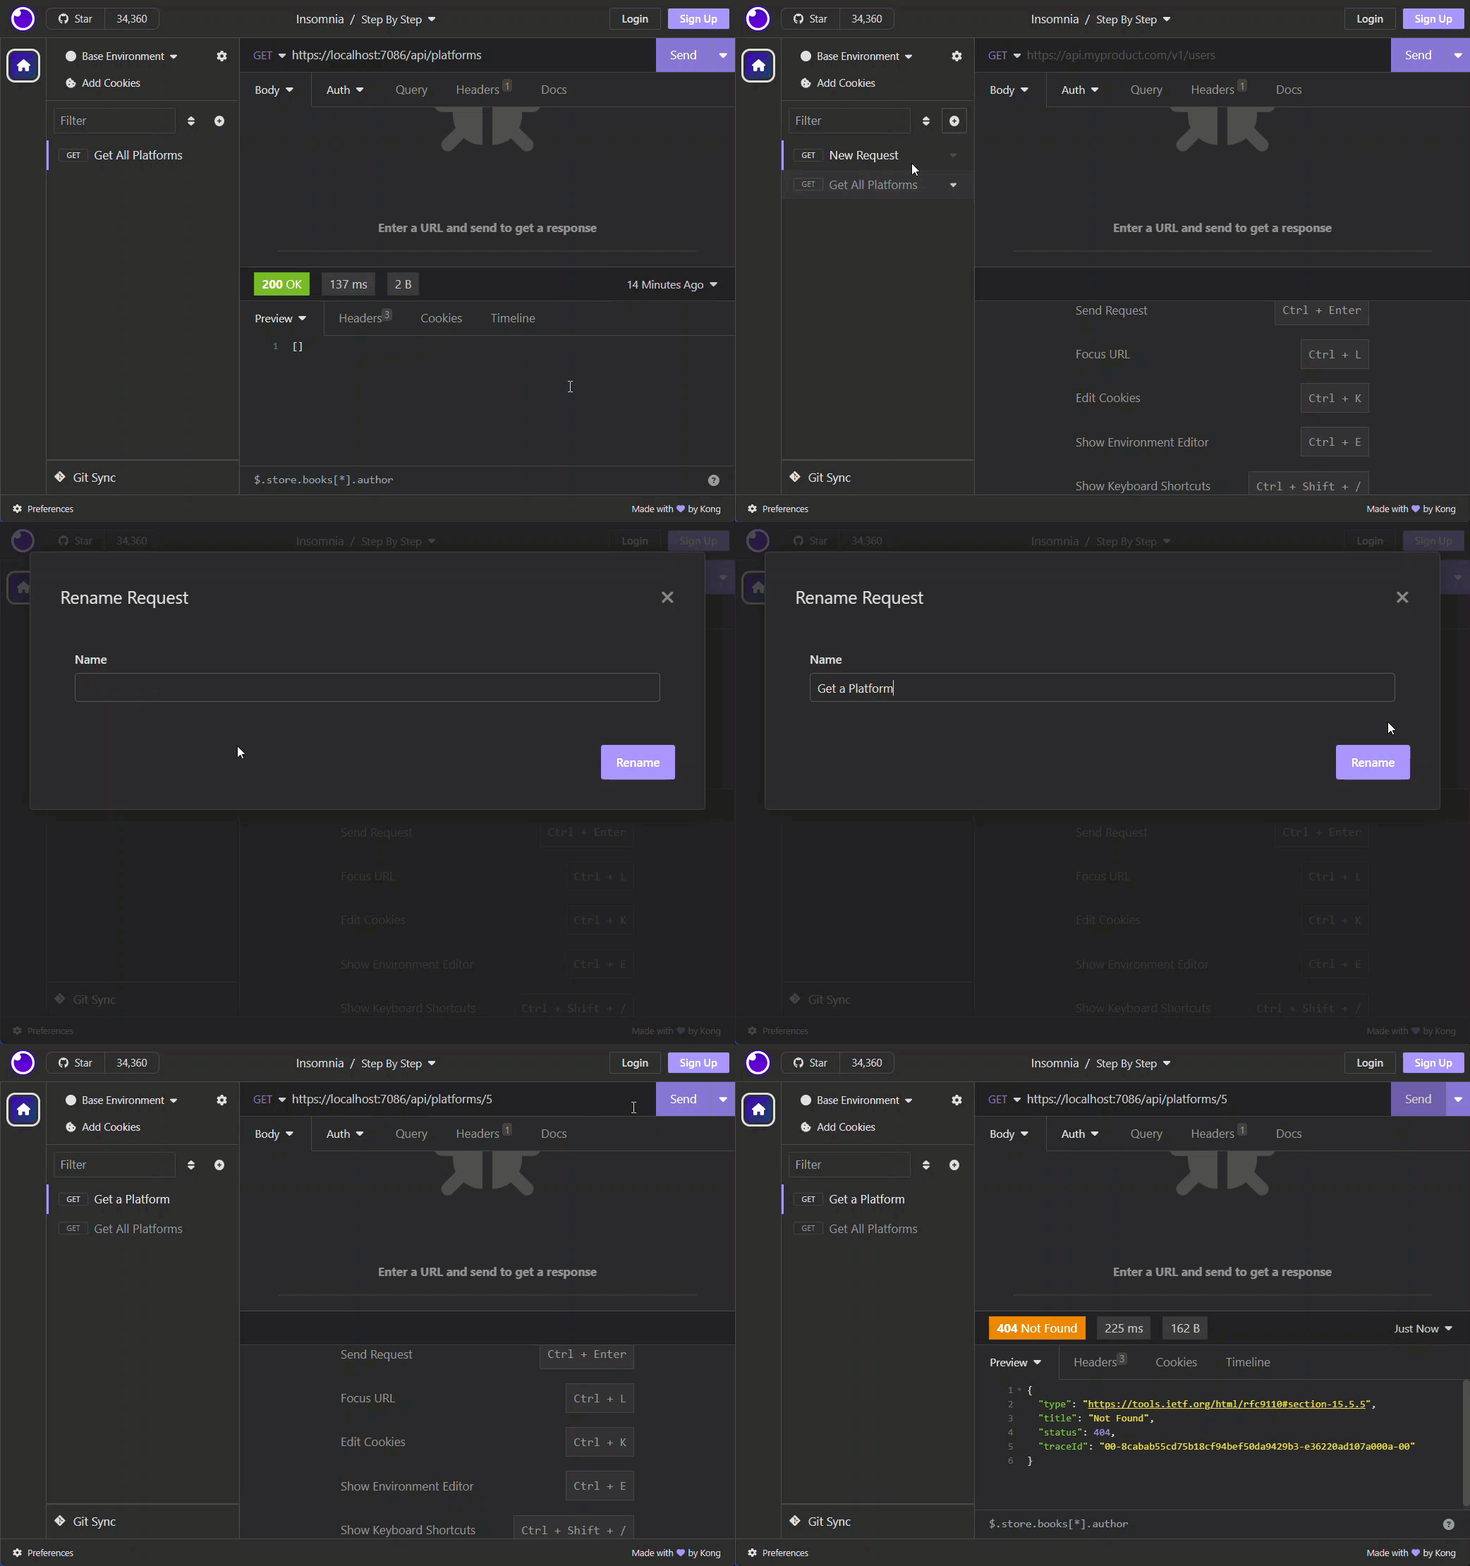
We can test the failing use-case here by making a GET request to the following route:
https://localhost:7086/api/platforms/5
NOTE: I’ve used the value of
5for our Id, this of course can be any integer.
CreatePlatform Action
The code for the CreatePlatform action is shown below:
[HttpPost]
public async Task<ActionResult<Platform>> CreatePlatform(Platform platform)
{
  if(platform == null)
  {
    return BadRequest();
  }
  await _context.platforms.AddAsync(platform);
  await _context.SaveChangesAsync();

  return CreatedAtRoute(nameof(GetPlatformById), new { Id = platform.Id}, platform);
}
Explanation in detail:
- The method is decorated with:
[HttpPost]- The method will respond to
POSTrequests - We expect a
Platformmodel to be passed in with the request body
- The method will respond to
- We first check to see if a platform has been provided
- If not, we return an HTTP 400 - Bad Request, otherwise we continue.
- We
awaiton the_contextmethodAddAsyncto add thePlatformmodel to our context - We
awaiton the_contextmethodSaveChangesAsyncto save the data down to our database- IMPORTANT without performing this step, data will never be persisted to the DB
- Finally we:
- Return the created product (along with it’s
id) in the response payload - Return the route to this new resource (a fundamental requirement of REST)
- Return a HTTP 201 Created status code.
- Return the created product (along with it’s
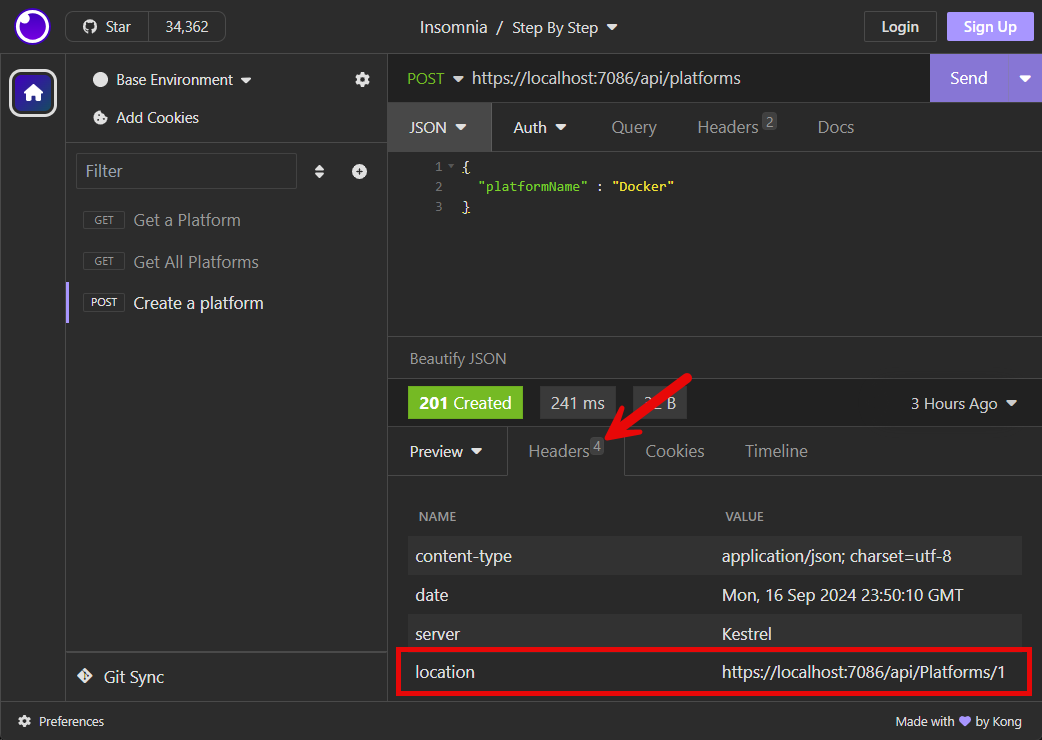
We can test the failing use-case here by making a POST request to the following route:
https://localhost:7086/api/platforms/
Make sure:
- You set the verb to
POST - You supply a JSON body with a Platform model specified, e.g.
{
  "platformName" : "Docker"
}
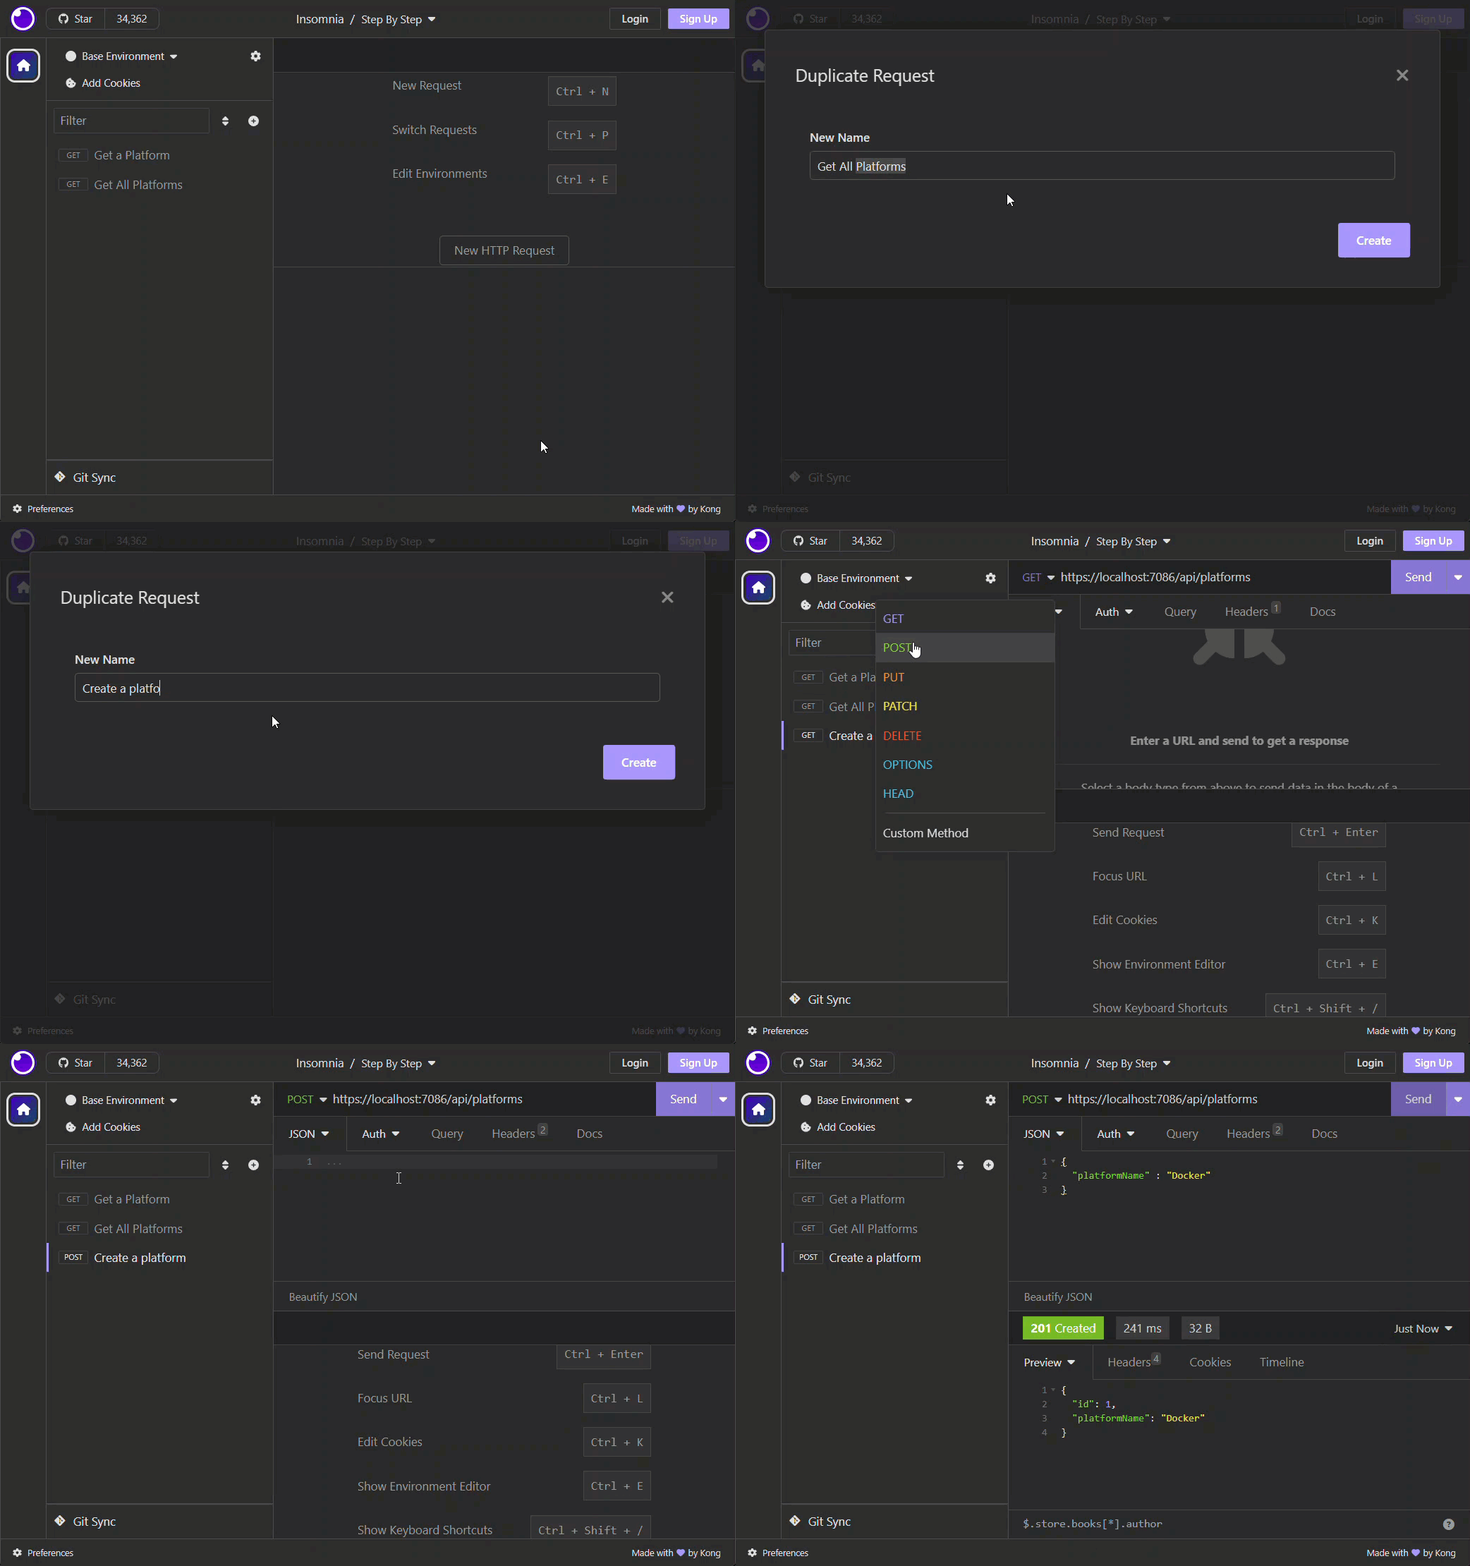
This should create a platform resource. Looking at the response headers we can see that the route to the resource has been passed back:
UpdatePlatform Action
The code for the UpdatePlatform action is shown below:
[HttpPut("{id}")]
public async Task<ActionResult> UpdatePlatform(int id, Platform platform)
{
    var platformFromContext = await _context.platforms.FirstOrDefaultAsync(p => p.Id == id);
    if(platformFromContext == null)
    {
      return NotFound();
    }

    //Manual Mapping
    platformFromContext.PlatformName = platform.PlatformName;

    await _context.SaveChangesAsync();

    return NoContent();
}
Explanation in detail:
- The method is decorated with:
[HttpPut("{id}")]- The method will respond to
PUTrequests - We expect a platform
Idto be passed in via the route - We expect a
Platformmodel to be passed in with the request body
- The method will respond to
- We use the
_contextto get theFirstOrDefaultplatform based on theid - If there is no match, then we return a HTTP 404 (Not Found) result, otherwise we continue
- We manually assign the PlatformName supplied in the request body to the Model we just looked up
- In Iteration 3 we’ll move to an automated way of mapping
- We
awaiton the_contextmethodSaveChangesAsyncto save the data down to our database- IMPORTANT without performing this step, data will never be persisted to the DB
- Finally we return a HTTP 204 No Content status code.
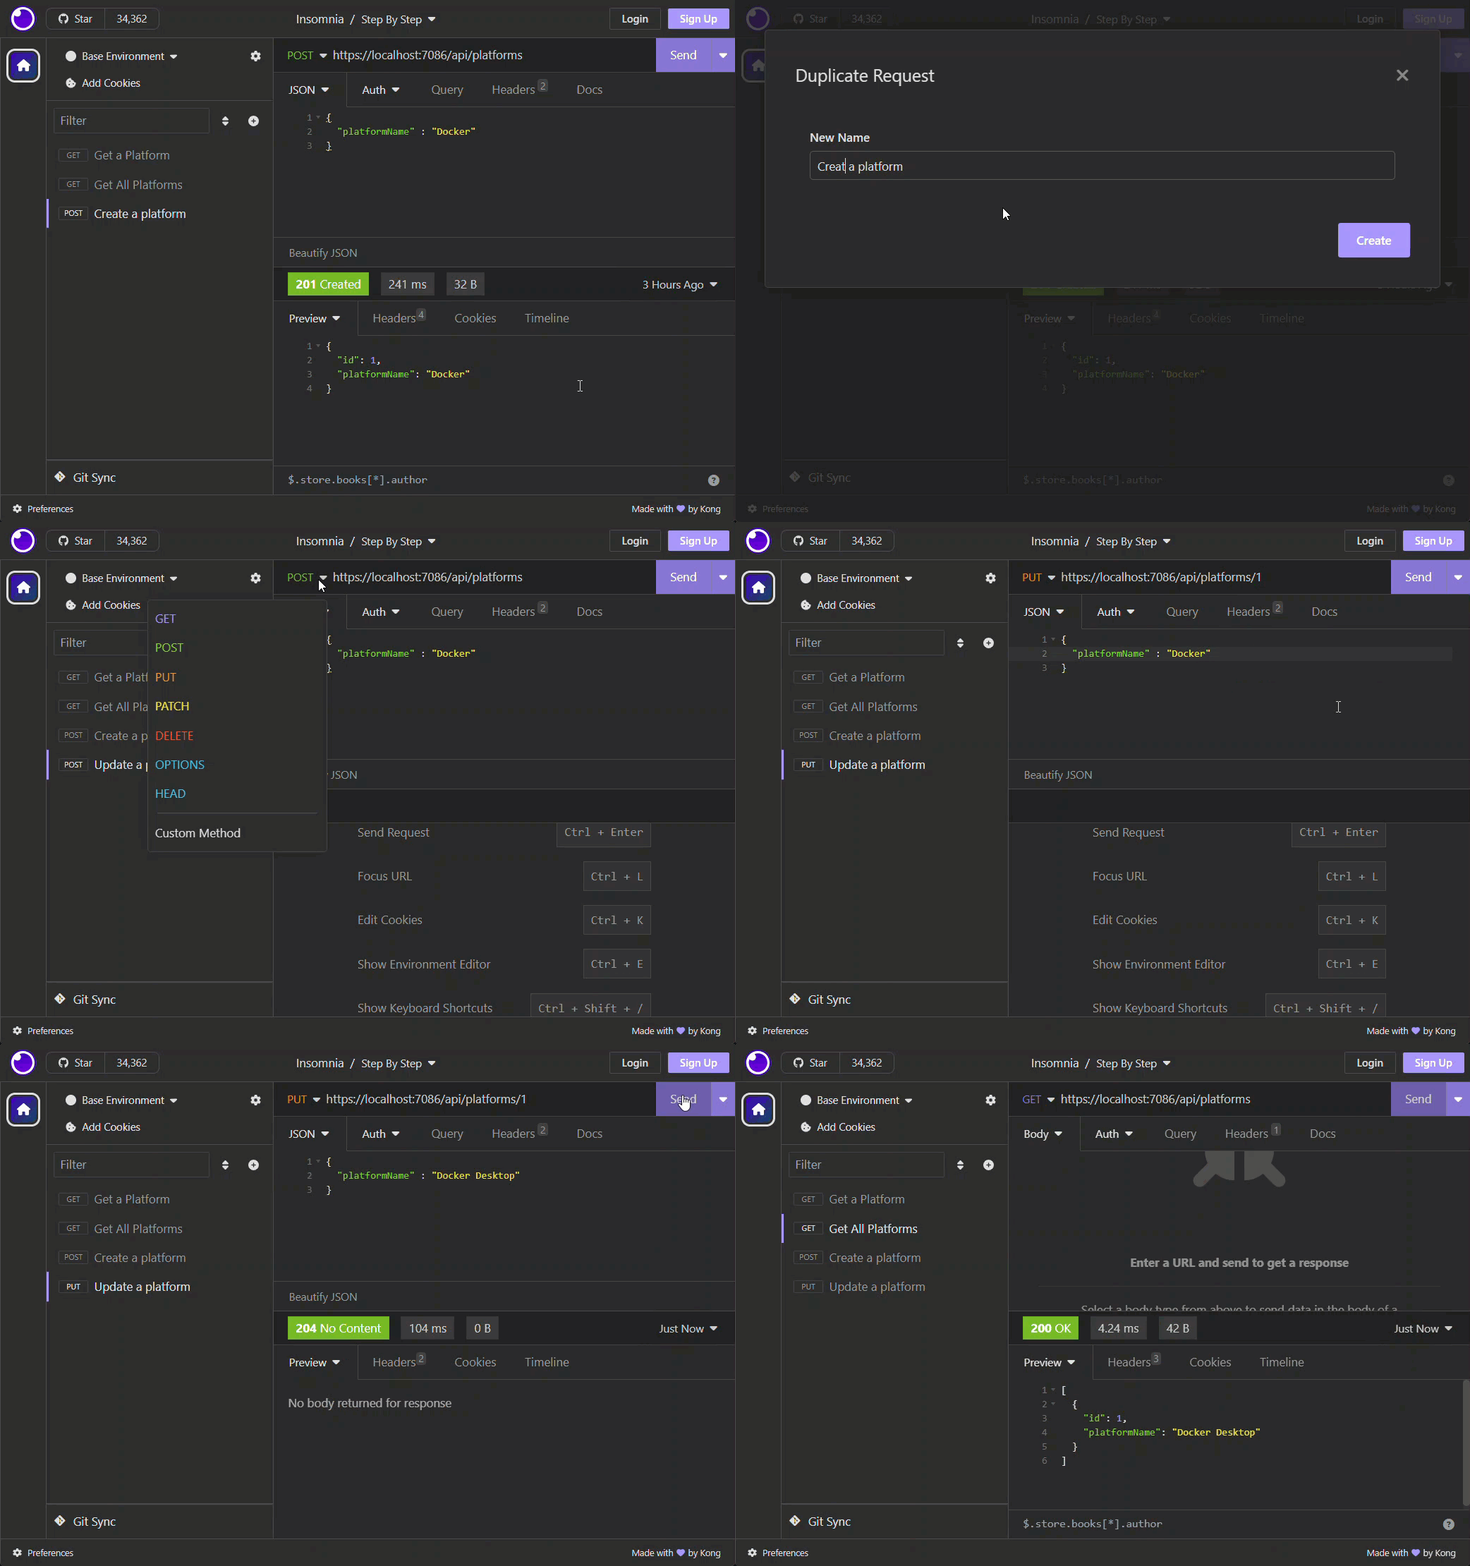
We can test the failing use-case here by making a PUT request to the following route:
https://localhost:7086/api/platforms/1
Make sure:
- You set the verb to
PUT - You supply an id that exists in out DB
- You supply a JSON body with a Platform model specified, e.g.
{
  "platformName" : "Docker Desktop"
}
DeletePlatform Action
The code for the DeletePlatform Action is shown below:
[HttpDelete("{id}")]
public async Task<ActionResult> DeletePlatform(int id)
{
    var platformFromContext = await _context.platforms.FirstOrDefaultAsync(p => p.Id == id);
    if(platformFromContext == null)
    {
        return NotFound();
    }
    _context.platforms.Remove(platformFromContext);
    await _context.SaveChangesAsync();

    return NoContent();
}
Explanation in detail:
- The method is decorated with:
[HttpDelete("{id}")]- The method will respond to
DELETErequests - We expect a platform
Idto be passed in via the route
- The method will respond to
- We use the
_contextto get theFirstOrDefaultplatform based on theid - If there is no match, then we return a HTTP 404 (Not Found) result, otherwise we continue
- We use the
_contextto call theRemovemethod and supply the model we had looked up - We
awaiton the_contextmethodSaveChangesAsyncto save the data down to our database- IMPORTANT without performing this step, data will never be persisted to the DB
- Finally we return a HTTP 204 No Content status code.
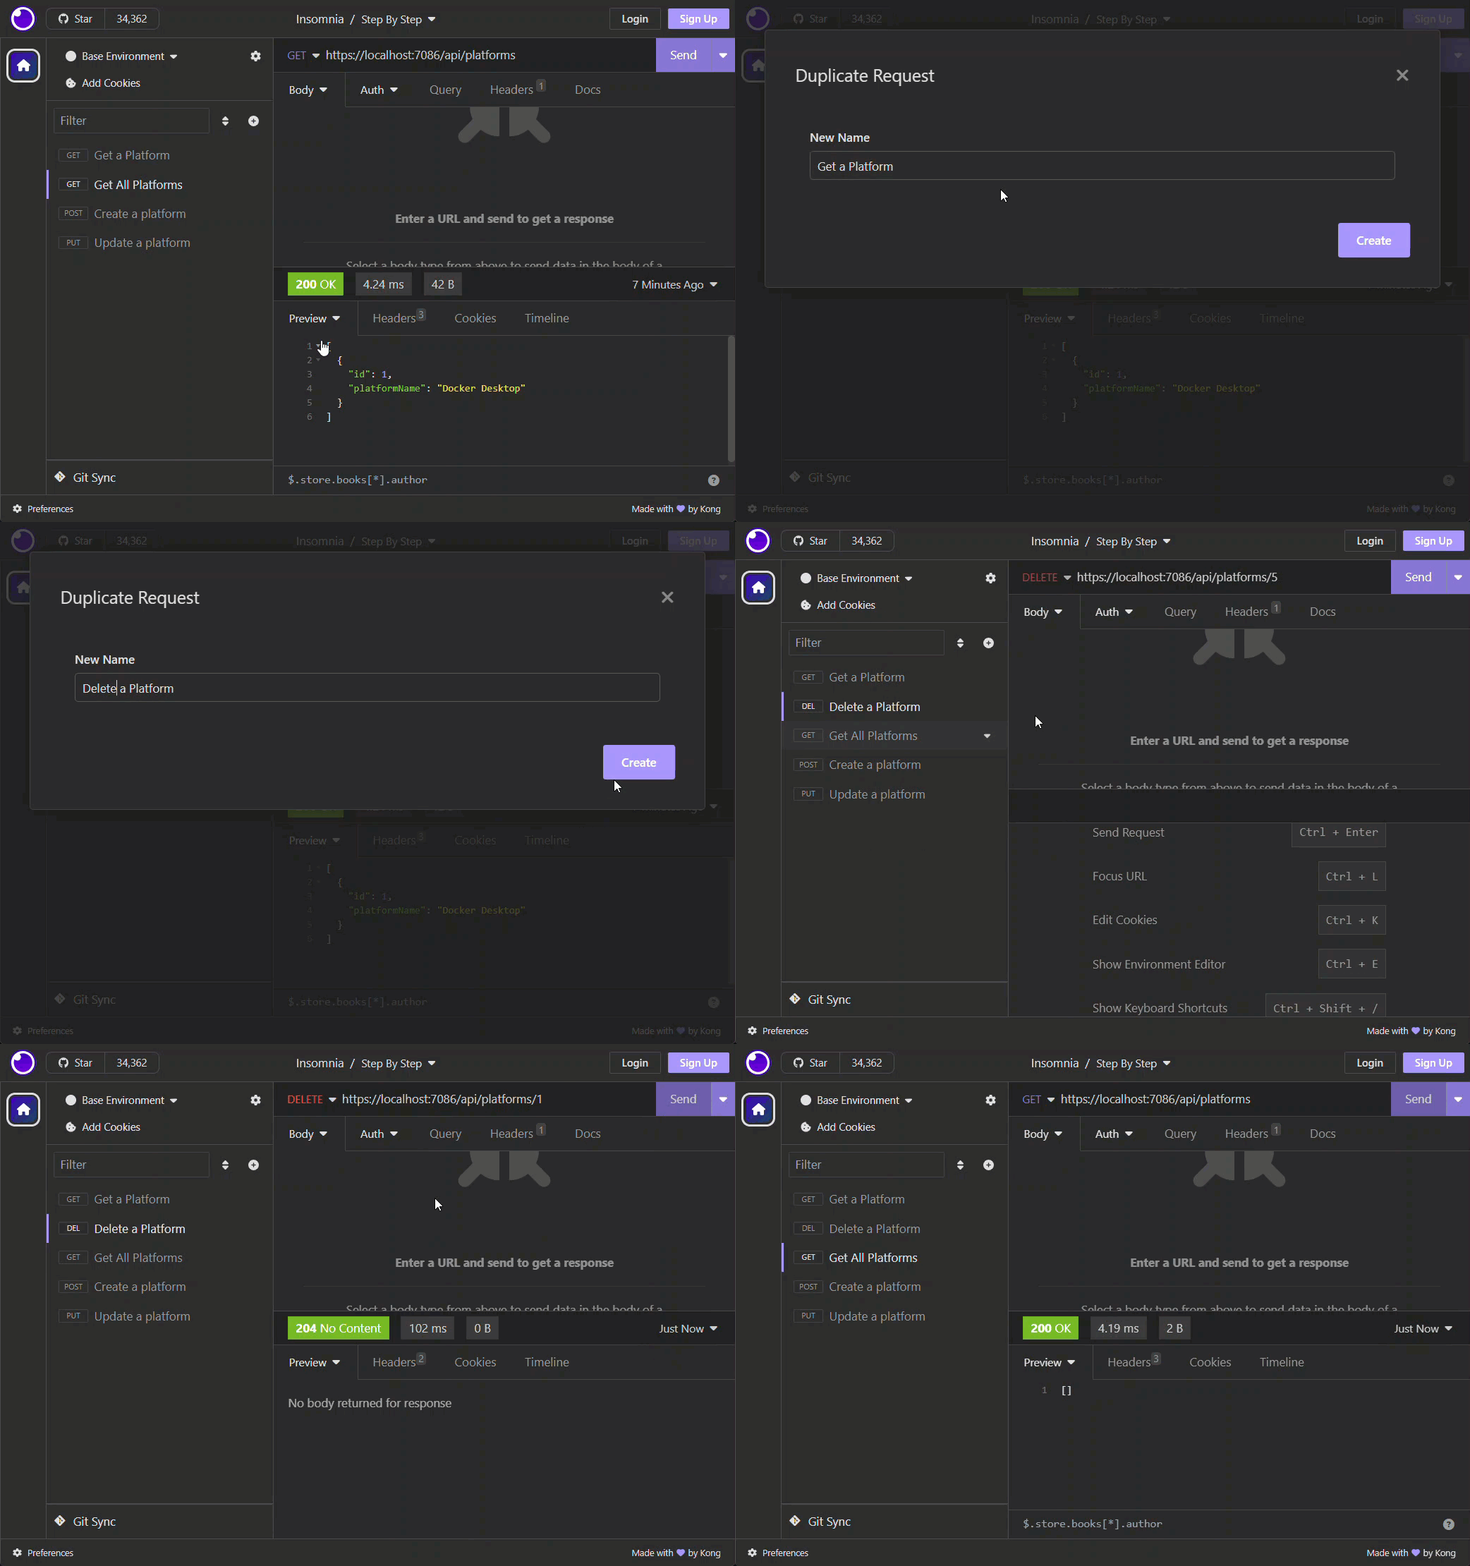
We can test the failing use-case here by making a DELETE request to the following route:
https://localhost:7086/api/platforms/1
Make sure:
- You set the verb to
PUT - You supply an id that exists in out DB
Commit to Git
Back in the section on Git, we initialized Git and created a feature branch - iteration_01. We have made a lot of changes to our code but not yet committed them, so we’ll do that now.
To stage all our files for commit, type:
git add .
To commit the files to this branch type:
git commit -m "feat: create baseline api"
We now want to merge these changes into our main branch (we have just committed to our feature branch at this point). To do:
git checkout main
This switches us back on the main branch, you may notice VS Code reflects that all the code we’ve just written has disappeared - don’t worry it’s still safe in out feature branch, but not yet on our main branch. To put it on main we need to merge:
git merge iteration_01
This will populate main with the code changes we’ve just worked on.
Iteration Review
Firstly - Congratualtions! We covers a LOT of material in this first Iteration, (maybe too much!). From here on in the Iterations become a lot more focused (and smaller) but I wanted to get this iteration under our belt with a working API that performs your typical CRUD operations on a single resource.