Iteration 0 - Set up and Design Overview
Chapter Summary
In this chapter we talk about the technologies that we are going to use, and go through some fundamental set up. Additionally, as we’ll be using the command line quite extensively, there will also be a crash course on some basics.
Learning outcomes
By the end of this chapter you will have learned:
- How .NET is a true cross platform framework
- The tools and technologies we are going to use throughout the book
- Basic set up of those tools (where relevant)
- Brief overview of using the command line
Cross Platform Development
Tools Of The Trade
Below is the manifest of the tools we’ll be using to build our API, and if you’re wanting to follow along with the book, these are the tools I suggest you use.
| Tool | What is it? | Platform | Cost |
|---|---|---|---|
| The “Command Line” | |||
| VS Code | Text editor | Windows, Linux, MacOs | Free |
| .NET SDK | |||
| Docker Desktop | |||
| DBeaver | |||
| Git | |||
| GitHub | |||
| Insomnia |
VS Code
Create a new VS Code Profile
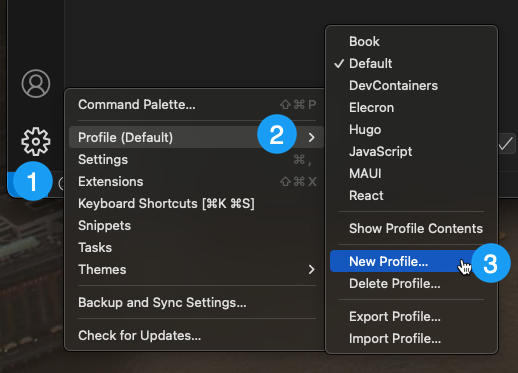
Open VS Code and open settings:
- Select the “Gear” icon
- Select “Profile”
- Select “New Profile…”
Give your profile a name and choose what to configure in the profile (I usually select everything):
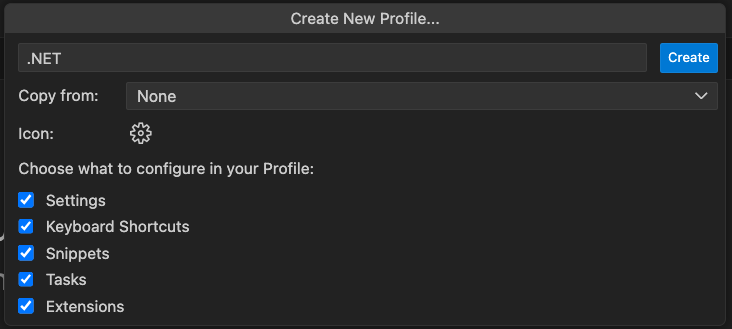
Click “Create” when ready.
Install Extensions
With our new profile selected, we’re going to add some VS Code extensions that we’ll use throughout the book. These are accessed via the “Extensions” button in the left hand menu of VS Code:
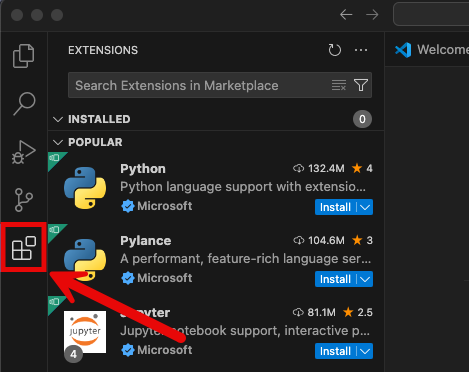
Search for the following extensions and then install them:
| Name | Publisher | Description |
|---|---|---|
| Docker | Microsoft | Allows you to create and manage Docker containers and images from within VS Code. |
| C# | Microsoft | Base language support for C# |
| Material Icon Theme | Philipp Kief | This is totally optional, it just adds a new set of file icons in the file explorer. |
Following the install of these your installed extensions should look as follows:
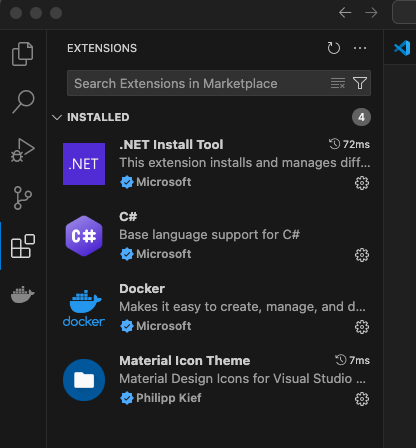
NOTE: You’ll see that we also have the .NET Install Tool extension here also, this is installed along with the C# extension.
What about the C# Dev Kit?
The C# Dev Kit is an extension for C# developers that was made generally available in October 2023. It builds on top of the C# extension we have already installed and provides (amongst other things) solution explorer functionality that you find in the big brother of VS Code: Visual Studio.
While we will be making use of a “Solution” structure, I don’t feel we need to use this extension to support that. If you do want to use it though that’s fine, you just may have a slightly different experience from the one I’ll document.
.NET SDK
Docker Desktop
DBeaver
Git
GitHub Tools
Azure CLI
Insomnia
Command Line Basics
We’ll be using the command line quite a bit throughout the book, so I thought I’d go through some basics here so everyone has a bit of a grounding.
Terminal, command line, shell etc…
Some people can get quite caught up in the correct term to use in this space, (I’m not one of them) however it does bear clarifying the language:
- Terminal: The app or program you use on your PC / Mac to execute commands
- Examples of terminals would be: Terminal on the Mac and Command Prompt on windows
- Shell: A command line interpreter that processes your commands
- An example of shells would be: bash, zsh (on Mac & Linux) and PowerShell (Windows)
- Command line: The method of entering commands to be executed
- Prompt: You type commands after the prompt in a terminal
So for instance I’m using a Mac to write this book and run the code - so I’m using Terminal as my terminal, and zsh as my shell, as show below:
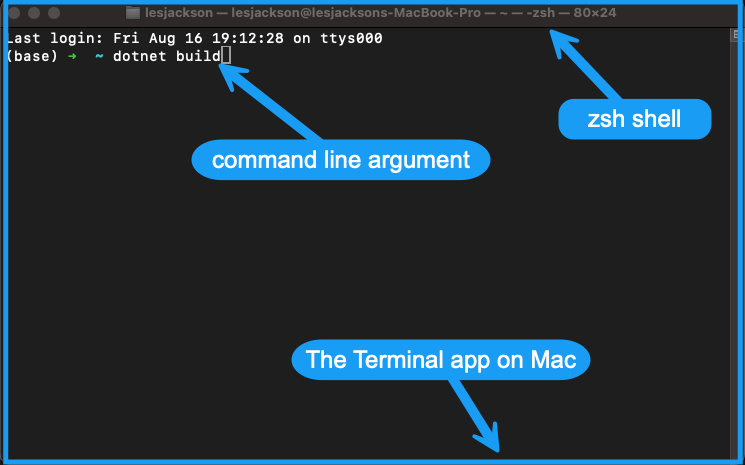
I’ll just be using the term Command Prompt throughout the book, even if terminal (or indeed some other term!) would be more correct.
The commands
For the most part we’ll be using the command prompt to:
- Navigate the file system
- Create directories and files
- Execute other commands to do our bidding, e.g. build code, start a Docker container or open VS Code
We’ll cover the the “other commands” as and when we need them, so here we’ll just focus on the file system commands.